Table of Contents
Protect
 Updated
by Rama Sadhu
Updated
by Rama Sadhu
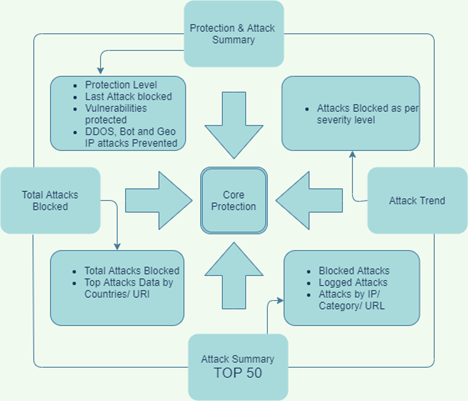
Core Protection
Core Protection provides an at-a-glance view of protection status of a website.
- Select Protect > Core Protection.
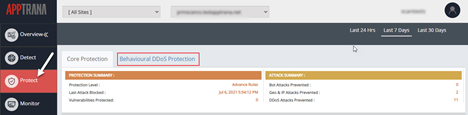
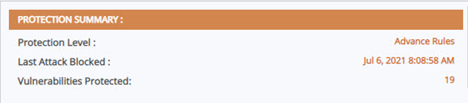
Protection Summary
Protection Level | A website can be protected by two kinds of protection levels that is either Advance Rules or Premium Rules |
Last attack Blocked | It displays the date and exact time of last attack blocked. |
Vulnerabilities Protected | It displays the number of vulnerabilities protected for the selected time span. |
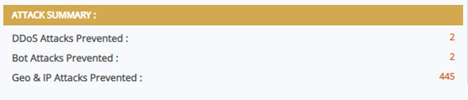
Attack Summary
Attack summary displays the number of DDOS attacks, Bot attacks, Geo and IP attacks prevented for selected time.
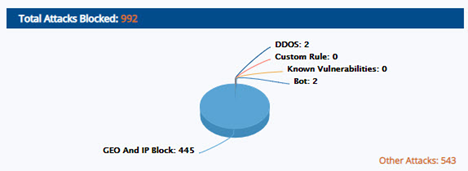
Total Attacks Blocked
Blocked attacks majorly DDOS attacks, Bot attacks, known vulnerabilities, Custom rule, and Other attacks. Total attacks blocked is displayed on pie chart with attacks count.
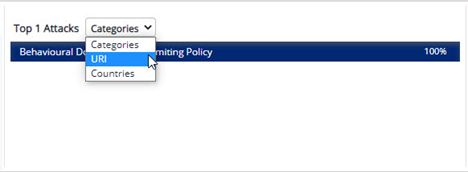
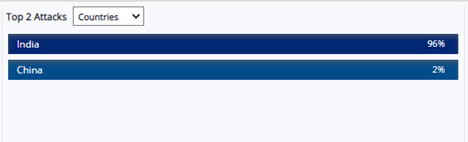
Top Attacks
Up to top 5 attacks data is displayed with percentage value. Click drop-down menu to filter the top attacks data by attack category, URI, and Countries.
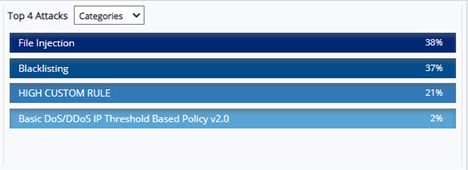
A) Top attacks by Categories
Select Categories option from drop-down menu to view the different category of attacks. Most common attacks categories are denial-of-service attack, SQL injection, Cross-Site Scripting, Command injection, Bot attacks and so on. The maximum number of attacks will be displayed in percentage by descending order.
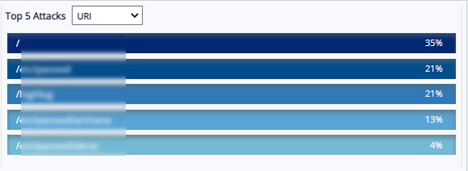
B) Top attacks by URI
Select URI option from drop-down menu to view the Top URIs. The maximum number of attacks will be displayed in percentage by descending order.
C) Top attacks by Countries
Select Countries option from drop-down menu to view the maximum number of attacks from a region in percentage by descending order.
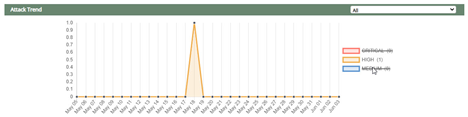
Attack Trend
Attack trend display the no. of bot attacks, DDOS attacks blocked and attacks of other category blocked as per the selection. Attacks severity is categorized as critical, high, and medium. Each severity level is defined with an unique color.
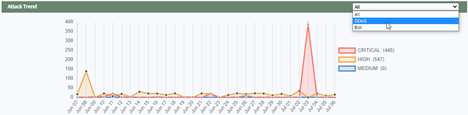
To display a specific severity such as high, click critical and medium options to strike or disable these options and view only the graph of high vulnerabilities.
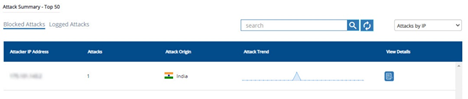
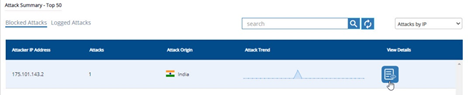
Attack Summary - Top 50
Attack summary includes both blocked and logged attacks.
Parameter | Description |
Attacker IP Address | IP address used by the attacker. |
Attacks | Blocked Attacks: Total number of attacks blocked. Logged Attacks: Total number of attacks logged. |
Attack Origin | Geographic location of attacker. |
Attack Trend | The attack trend is displayed with all the three critical, high, and Medium attacks for a week or month as per the selection. |
View Details | Click View Details icon to display the Attack Trend. |
Mouse over any specific attack trend peak to view the details.

A drop-down menu is given to filter the data like Attacks by IP, Attacks by Category, Attacks by URLs.

Click View Details icon of a specific IP address. Attack Trend pop-up appears.
The attack trend is displayed with all the three critical, high, and medium attacks for a week or month as per the selection.

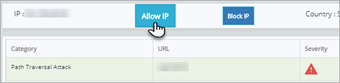
Parameter | Description |
Category | Attack category name is displayed here. |
URL | URL of the attacker is displayed in this column. |
Severity | The severity of an attack is displayed in this column. Specified color for a severity is displayed. Mouse over the color to display the severity. |
Attack Date | The date and time of an attack being performed is displayed here. |
Payload | This pop-up displays payload data, Unique Id etc., which is unique for each category or IP address. |
Payload
Whitelist IP
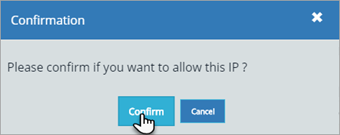
To whitelist a specific IP address, click Allow IP button. A confirmation pop-up appears.
Click Confirm button to allow the IP address otherwise, click Cancel button.
Blacklist IP
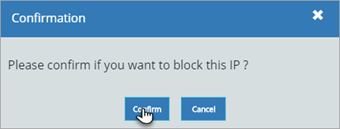
To blacklist a specific IP address, click Block IP button. A confirmation pop-up appears.
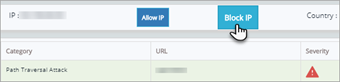
Click Confirm button to proceed with the action otherwise, click Cancel button.
Blacklist Country
To blacklist a specific country as there are lot of attacks from it, click Block Country button. A confirmation pop-up appears.

Click Confirm button to proceed with the action otherwise, click Cancel button.

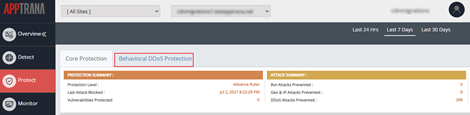
Behavioral DDOS Protection
This page provides customers with the ability to manage different protection policies created by AppTrana.
- Select Protect > Behavioral DDOS Protection.
AppTrana Protection Policy Types
AppTrana offers two different policy types for protection.
- System Defined Protection Policies- These are predefined policies created by system based on the parameters such as Host, IP, and Session.
Three system defined policies are available all time for customers.
1. App rate limiting policy
2. IP rate limiting policy
3. Session rate limiting policy
- User Defined Protection Policies- These policies are created by customers as per customer’s preference.
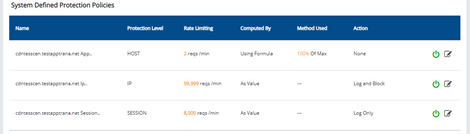
System Defined Protection Policies
Field | Description |
Name | Three system defined policies are available all time for customers. 1. App rate limiting policy 2. IP rate limiting policy 3. Session rate limiting policy |
Protection Level | Three protection levels are defined for customers. 1. Protection level by Host 2. Protection level by IP 3. Protection level by Session |
Rate Limiting | Set rate limiting based on: 1. Limit requests per host, per minute 2. Limit requests per IP, per minute 3. Limit requests per session, per minute |
Computed By | As Value: Enter the number for requests you want to allow per minute. Using Formula: Enter the percentage value by analyzing previous two weeks data. |
Method Used | · Manually enter a value · Use Max or Median formula |
Action | Log only, Log and Block, and None are the options available. |
Activate/ Deactivate | Activate/ Deactivate a policy for all sites associated with the account. |
Edit Policy | Opens the policy to modify the data. |
Customers can not delete any policy from System Defined protection Policies. Only customer can either Activate or Deactivate it.
Edit Policy
- Choose the policy you want to edit and click Edit Policy icon.
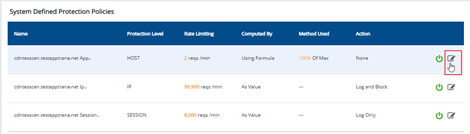
Customers can only edit a policy when the policy is on activated mode.
- Inside policy page customers can update the rate limiting, action, and so on.
Click Save to apply changes.
A confirmation pop-up will appear to save changes in the policy.
Click Yes to proceed with the changes. A success pop-up will appears.
User Defined Protection Policies
User defined protection policies allow customers to create own policies and provide more access to manage DDOS protection.
Create a New policy
- Click Create New Policy.

- Select a policy type you want to create and click Confirm. For details, Click AppTrana Protection Policy Types.
For Example: Customer wants to create a IP Rate limiting Policy.

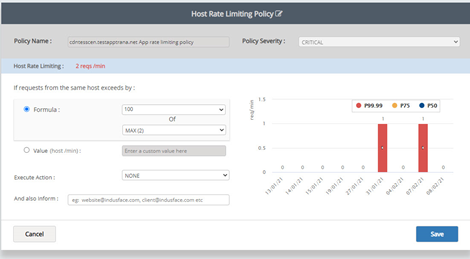
- Enter the name in Policy Name field. By default, Policy severity is selected as Critical.

- Set IP Rate Limiting: Customers can set IP Rate limiting by using formula( such as median or max of last 2 previous weeks data) or by entering a number.
Use formula to set IP rate limit:
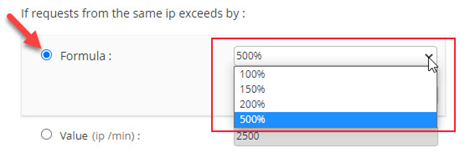
- Select the Formula radio button.
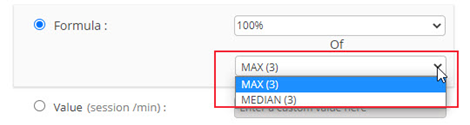
- Enter a percentage value or select any percentage value from drop-down menu. In drop-down menu four defined values such as 100%, 150%, 200%, and 500% are given.
- Max and Median options are given in drop-down.
For Max:
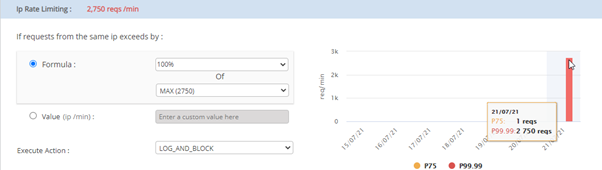
As per the above graph, the maximum requests (P99.99) for last week are 2750.
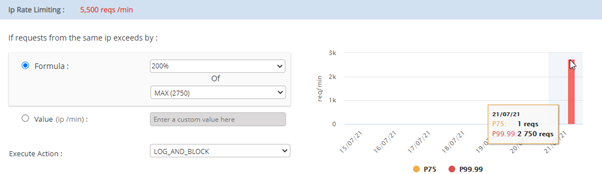
When you increase the percentage value from 100 to 200 percentage of the max value (that is 2750), IP rate limiting will be changed to 5500.
For Median:
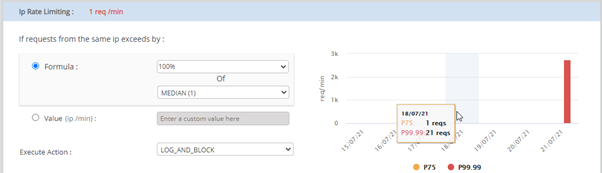
As per the above graph, the median request for last week is 1. When you increase the percentage value from 100 to 200, IP rate limiting will be set as 2 requests.
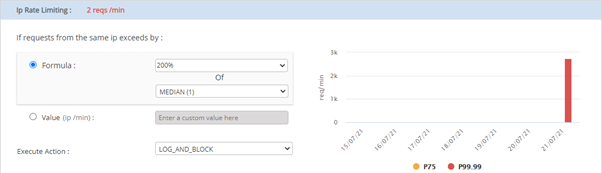
- Go to Execute Action field, a drop- down is given to choose the action when the policy is breached. Also, customers can get the executed action details to their mail box by providing a valid email address.

Action | Description |
Log and Inform | An email will be sent to the customer when the policy is breached. No action will be performed to the further requests. |
Block and Inform | When the policy is breached, it blocks the further requests for next 2 minutes and an email will be sent to the the customer with details. |
- Click Create Policy and a confirmation pop-up will appear.
Click Yes and a success pop-up will be displayed.
Rate limiting by Host level:
Walk through the following example for better understanding:
S. No | Date | Time | IP | Session | Request/min |
1 | 20-08-2021 | 00:01AM | A | A | 10 |
2 | 20-08-2021 | 00:01AM | B | B | 20 |
3 | 20-08-2021 | 00:01AM | C | C | 30 |
4 | 20-08-2021 | 00:02AM | X | A | 30 |
5 | 20-08-2021 | 00:02AM | Y | B | 20 |
6 | 20-08-2021 | 00:02AM | Z | D | 20 |
7 | 20-08-2021 | 00:02AM | Z | D1 | 30 |
8 | 20-08-2021 | 00:02AM | Z | D2 | 50 |
At 00.01 AM,
The number of requests received from IP – A is 10
The number of requests received from IP – B is 20
The number of requests received from IP – C is 30
Total requests received at 8.00 AM is A+B+C, that is (10+20+30) 60.
At 00.02 AM,
The number of requests received from IP – X is 30
The number of requests received from IP – Y is 20
The number of requests received from IP – Z is 20 during session D
The number of requests received from IP – Z is 30 during session D1
The number of requests received from IP – Z is 50 during session D2
Total requests received at 8.01 AM is X+Y+Z, (Z= D+D1+D2), that is (30+20+(20+30+50)) 150.
Like this, the total number of requests received in each minute is calculated.
For a day, 24 hours and for an hour 60 minutes, and total is 1440 minutes.
All the requests received for each minute will be put in ascending order.
(Example: 60,150,180,190,198,269...700, total 1440 entries)
P99 is the maximum number of requests received, that is 700.
Entry | 1 | 2 | 3 | 4 | . | . | . | . | 1080 | . | . | 1440 |
Requests | 60 | 150 | 180 | 190 | . | . | . | . | 450 | . | . | 700 |
P75 will be 75th percentile of total requests received, that is (1440*0.75 =1080).
Requests received at 1080 entry is the P75 value, that is 450.
Rate Limiting by IP Level:
Walk through the following example for better understanding:
S. No | Date | Time | IP | Request/min |
1 | 20-08-2021 | 00:01AM | A | 10 |
2 | 20-08-2021 | 00:01AM | B | 20 |
3 | 20-08-2021 | 00:01AM | C | 30 |
4 | 20-08-2021 | 00:02AM | X | 50 |
5 | 20-08-2021 | 00:02AM | Y | 70 |
6 | 20-08-2021 | 00:02AM | Z (Session-D1) | 20 |
7 | 20-08-2021 | 00:02AM | Z (Session-D2) | 30 |
8 | 20-08-2021 | 00:02AM | Z (Session-D3) | 50 |
At 00:01 AM,
The number of requests received from IP – A is 10
The number of requests received from IP – B is 20
The number of requests received from IP – C is 30
At 00.02 AM,
The number of requests received from IP – X is 50
The number of requests received from IP – Y is 70
The number of requests received from IP – Z is 20 during session D
The number of requests received from IP – Z is 30 during session D1
The number of requests received from IP – Z is 50 during session D2
Here, from IP – Z total requests received is (Z= D+D1+D2) 100.
All the requests received from different IPs will be put in ascending order.
Case study: We have received requests from 6 different IP addresses.
That is [IPs-A, B, C, X, Y, Z] and requests are [10,20,30,50,70,100]
P99 is the maximum number of requests received, that is 100
P75: will be the number of IPs *0.75, that is (6*0.75= 4.5) 5.
Requests received at 5th entry is the P75, that is 70.
Rate Limiting by Session Level:
Walk through the following example for better understanding:
S. No | Date | Time | IP | Session | Request/min |
1 | 20-08-2021 | 00:00AM | A | A | 10 |
2 | 20-08-2021 | 00:00AM | B | B | 20 |
3 | 20-08-2021 | 00:00AM | C | C | 30 |
4 | 20-08-2021 | 00:01AM | X | X | 30 |
5 | 20-08-2021 | 00:01AM | Y | Y | 100 |
6 | 20-08-2021 | 00:01AM | Z | Z | 200 |
7 | 20-08-2021 | 00:01AM | Z | Z1 | 300 |
8 | 20-08-2021 | 00:01AM | Z | Z2 | 500 |
At 00:01 AM,
The number of requests received from IP – A and Session – A is 10
The number of requests received from IP – B and Session – B is 20
The number of requests received from IP – C and Session – C is 30
At 00.02 AM,
The number of requests received from IP – X and Session – X is 30
The number of requests received from IP – Y and Session – Y is 100
The number of requests received from IP – Z and Session – Z is 200
The number of requests received from IP – Z and Session – Z1 is 300
The number of requests received from IP – Z and Session – Z2 is 500
All the requests received from different IPs and different sessions will be put in ascending order.
Case study: We have received requests from 6 different IP addresses and 8 different sessions.
That is [IPs- A, B, C, X, Y, Z], [Sessions- A, B, C, X, Y, Z, Z1, Z2], and requests are
[10, 20, 30, 30, 100, 200, 300, 500].
P99 is the maximum number of requests received in which session, that is 500.
P75 is percentile of total sessions.
P75= [(Total number of sessions=8) * 0.75=6]
Requests received at 6th entry is the P75, that is 200.
Deactivate and Delete a policy
Customers can Deactivate and Delete any User defined policy.
Deactivate:
- Select a policy from user defined policies and click power icon to deactivate.

- A confirmation pop-up will appear. Click Confirm to deactivate the policy.
- A success pop-up will appear. Click Okay to close the pop-up.
Activated Policy power icons are displayed in green color. Deactivated Policy power icons are displayed in orange color.
- To activate the policy again, select the deactivated policy and click power icon.
Click confirm and a success pop-up will be displayed. Click Okay to close the pop-up.
Delete:
- Select a policy from user defined policies and click delete icon.

A confirmation pop-up will appear. Click Confirm to delete the policy.

A success pop-up will appear and click Okay to close the pop-up.
Note: Deleted policies can't be retrieved, once it is deleted from the list.
URI-Based DDoS Policy
In line with our Behavioral DDoS feature, we have released the URI-based DDoS Protection feature to provide granular security for our AppTrana customers.

Steps to Create a URI Based DDoS Policy
- Click on Create New Policy.
- Choose the IP URL Limiting Policy or Session URL Limiting Policy.
- Enter the URL (/example1.php) and click on the Confirm button.

- Now, you’ll be redirected to the policy page.
The policy page includes the following details:
Parameter | Description |
Policy name | Enter the policy name in this field |
URL | The given URL name is displayed here, and this field cannot be edited. |
Severity | By default, the severity is considered as Critical, and this field cannot be edited. |
IP_Url Rate limiting/ Session_Url Rate Limiting |
|
Execute Action | An action will be triggered once the policy is breached. |
And also inform: | Enter a valid email address and the executed action details will be sent to the given email address. |

- After entering all the details, click on the Create button. You’ll receive a confirmation pop-up and then, click on Yes.
- Once the policy is ready, it will show up in the user- defined policies table.

- Click on the power icon to activate the policy. A confirmation pop-up will appear and then, click on the Confirm button.

- A success/Status Confirmation pop-up will appear. Click on the Okay button to close the pop-up.

- Once the policy is activated, the Edit policy button will be enabled.
Block Duration in IP Rate Limiting Policy
This is an advanced feature designed only for the AppTrana Advance Plus and Premium customers to improve their BDDoS Protection
This feature helps users to set the block duration to an IP when the no. of requests to that IP exceeds the rate limit.
AppTrana users can set the block duration by selecting a particular time span. Time spans are given in five modes, they are 2mins, 5mins, 10mins, 30mins, and 60mins respectively.
If any IP exceeds its rate limit, the same IP will be automatically blocked for the above selected block duration.

How it works?
- Click Protect > Behavioral DDoS Protection and choose a website.
- Go to the System Defined polices/User Defined Policies section.
- Select any IP rate limiting policy and click Edit policy icon.

- Set the IP rate limit by using the formula or enter the value manually.
- Select the LOG_AND_BLOCK option as executive action.
- Click the drop-down menu in the Block Duration field and select any time span. (2mins, 5mins, 10mins, 30mins, or 60mins)
- Click Save to update the changes.
- A confirmation pop-up appears. Click Yes to confirm.