Table of Contents
Total Application Security Reference Architectures for AWS Deployment
Indusface TAS Architecture Overview
This document provides guidance on deployment patterns Indusface | All Rights Reserved for AWS customers using Total Application Security (TAS) from Indusface, a fully managed security solution. Indusface TAS helps detects application-layer vulnerabilities with web application scanning (detect), protects instantly with web application firewall (protect) and monitors traffic continuously to block emerging threats and DDoS attacks (monitor).
Our security experts are available 24 x 7 to analyze DDoS and other attack patterns. They also perform pen testing to find complex vulnerabilities and create application specific rules to block attacks. Proactive false positive elimination further ensures that genuine visitors are not blocked.
Designed specifically for AWS customers, Indusface TAS supports AWS Auto-Scaling and integrates with AWS ELB. BYOL deployment is recommended for customers who have multiple applications.
Why AWS?
Gartner places AWS as the market leader in IaaS space with the computer capacity greater than the aggregate of the next 14 vendors. Clearly, with availability in 190 countries, through 13 geographic regions, 35 Availability Zones and over 50 local points of presence, AWS is the de facto market leader. Hosted within the AWS infrastructure, Indusface offers the one stop solution for all the application security needs. By leveraging Indusface, you can provide better security to your cloud applications than the on-premise world. The deployment guidelines that follow below describe a set of validated reference architectures, which have been implemented at dozens of customer sites.
Deployment Guidelines
“Deployment Guidelines” are IT architecture patterns and represent the most common design approaches used by our customers when using Indusface TAS in AWS. Major scenarios explained are:
- Indusface TAS deployed behind ELB
https://aws.amazon.com/elasticloadbalancing/
- Indusface TAS deployed in an Auto Scaling Group
https://aws.amazon.com/autoscaling/
- Indusface TAS deployed behind CDN
https://en.wikipedia.org/wiki/Content_delivery_network
- Opening Web Sockets in TAS
https://en.wikipedia.org/wiki/WebSocket
Indusface TAS deployed behind ELB
The diagram provides the typical AWS environment on which applications are deployed. Please note that we have intentionally excluded additional components (such as NAT devices, subnets, security groups, etc.) for the ease of understanding.
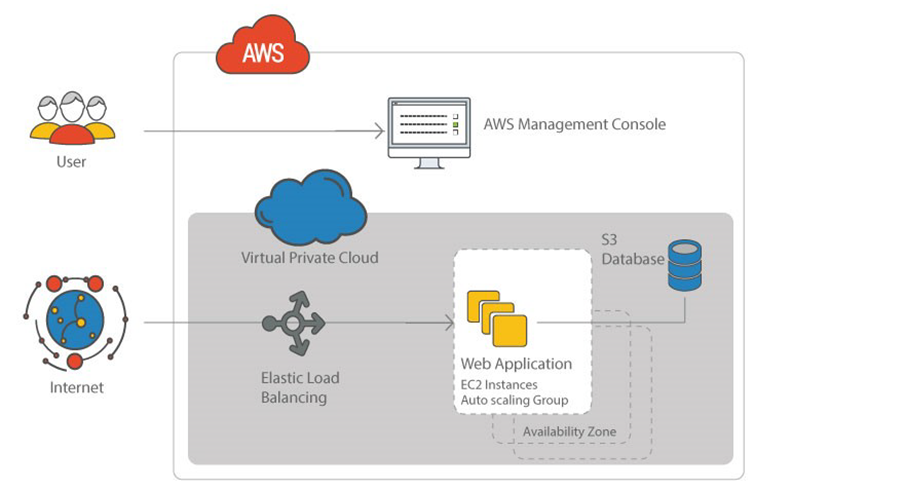
Figure 1: Typical AWS Architecture, where applications are accessed through ELB (Elastic Load Balancer).
The simple way to deploy TAS is as shown in Figure 2. In such scenario, it is recommended that SSL is terminated in ELB, this will reduce the overhead on the web server and avoid double encryption.
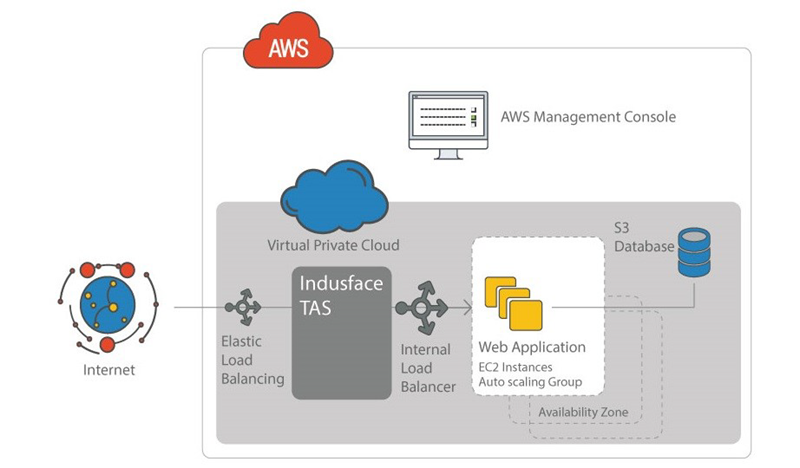
Figure 2: Typical TAS deployment
Configuration:
- When SSL terminate in ELB, the deployment is simple and TAS will listen and forward traffic on port 80.
- To load balance the traffic forwarded from TAS, an ILB (Internal Load Balancer) needs to be introduced.
- It is recommended to have the ILB in TCP proxy mode so that the x-fwd-xxx headers are not modified before the servers receive the traffic.
SSL termination on ELB is not possible if web server listens on port 443. In such scenarios, ELB acts as a proxy on 443 and SSL termination should happen at TAS as for any Web Application Firewall to work, it should be able to monitor unencrypted traffic. Since the web server listens on port 443, TAS will encrypt the data again and forward it on port 443, leading to double encryption.
High traffic production sites are recommended to deploy TAS using auto scaling group as explained in the following section to avoid a single point of failure.
Indusface TAS deployed in Auto-Scaling Group
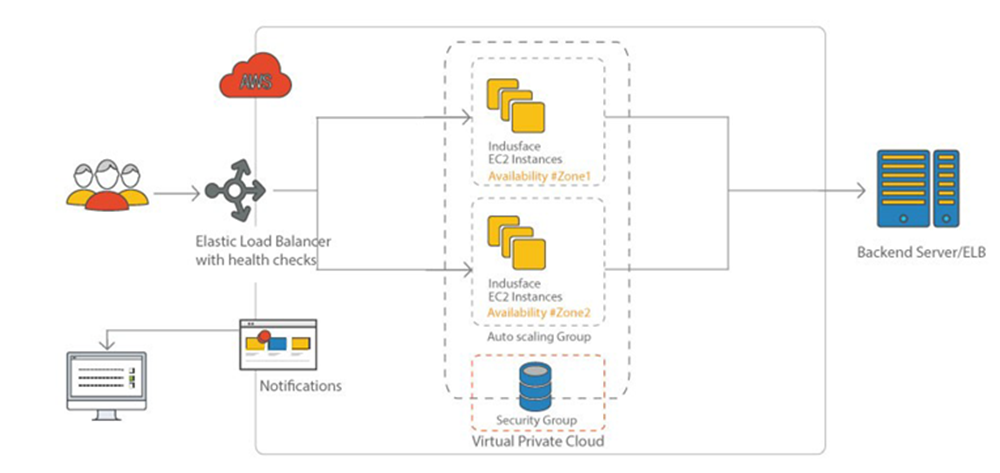
Figure 3: Auto-scaling Configuration with at least two instances from the AWS management console.
Indusface TAS integrates with AWS services to offer Auto scaling capabilities that can enable customer’s security infrastructure to scale up or scale down based on CPU or Load Thresholds.
Within the AWS Public cloud, Indusface TAS instances are launched as EC2 instances that run on hardened Linux-based operating systems. This section explains creating an Auto-scaling configuration from the AWS management console.
If Servers are configured with auto-scaling, then adding the WAF layer will mean modifying the auto scaling setup of their web application design.
List of AWS services needed:
- Virtual Private Cloud
- Elastic Cloud Compute
- Simple Storage Service
- SNS
- CloudWatch
List of Prerequisites:
- Configured AMI
- Availability Zones (AZ)
- VPC and Subnet information
- Elastic Load Balance
Best Practices:
It is suggested to have a minimum of two Instances across Availability Zones to offer DC redundancy.
Alarms:
-
Scale Up Early: It helps to launch instances when there are indications of the load going up.
- Scale Down Slowly: It helps to conservatively de-provision the instances.
Modification of the Alarms can be done by using Amazon CloudWatch Management Console.
Creating an Auto Scaling Group
To create Auto Scaling group, launch the configuration followed by Auto Scaling group.
- Browse to https://console.aws.amazon.com, provide username and password and then click Login.
- Click EC2, EC2 dashboard will appear. In the left navigation pane, click Launch Configuration under AUTO-SCALING.
-
Launch Configuration page will appear. Click Create Launch Configuration.
- Click AWS Marketplace and search for Indusface WAF and select.
- Click Choose Instance Type, select one instance type for your application depending on the sustained bandwidth in your environment. (for details refer to
AMI Instance Type Guidelines) and then click Configure Instance details.
- Specify the instance details and click Add Storage (Multiple instances can be launched from the same AMI). Keep the default storage settings.
- Edit the Size and Volume Type as per requirement in Add Storage page and then click Tag Instance.
Specify the Key, Value and then click Configure Security Group. [E.g. Key – Name, Value-SaaS_Instance].
-
The page will navigate to Configure Security Group. Select either an existing Security group or create a new Security group.
-
To Create new security group, click Add Rule to add the rules and specify the type, protocol, port range, and source. Choose Review and Launch to review and launch the instance.
For HTTP Website
For HTTPS Website
For HTTP & HTTPS Website
HTTP
HTTPS
HTTP & HTTPS
SSH
SSH
SSH
Port (8080)
Port (8080)
Port (8080)
Connection Method
Protocol
Port Range
Source (IP or Group)
HTTPS
TCP
443
0.0.0.0/0
HTTP
TCP
80
0.0.0.0/0
Custom TCP Rule
TCP
8080
0.0.0.0/0
SSH
TCP
22
Source IP
-
The page will navigate to Review Instance Launch page, click Launch to launch the configuration.
- For Select an existing key pair or create a new key pair, select one of the listed options. Select the acknowledgment check box, and then choose to Create launch configuration.
- Once launch configuration is created, click Create Auto Scaling Group using this Launch configuration, then the page will direct to Auto Scale Group configuration.
- On the Configure Auto Scaling Group details page, type a name for your Auto Scaling group.
- Keep Group size default value of 1 instance.
- Select a VPC in Network or you can select EC2-Classic and select a subnet from Subnet drop down.
- Keep Group size default value of 1 instance.
-
Click Configure scaling policies and then select Use scaling policies to adjust the capacity of this group.
- By default, there will not be any alarms, below are the steps to create a CloudWatch alarm.
- Open the CloudWatch console at https://console.aws.amazon.com/cloudwatch/
- On navigation pane, choose Alarms.
- Choose to Create Alarm.
- In Create Alarm page, enter CPU utilization in the Search metrics text box and click enter. This will list all instances with CPU utilization, find for Indusface WAF Instance with which you would like to enable the alarm and select.
- click next and Create Alarm page will appear.
- To avoid frequent scale up, scale down, usually, metrics are over a period.
- Name of the Metric is recommended to be given as Avg CPU utilization and description of threshold as “setting scale up threshold” or “setting scale down threshold” depending on the value of the threshold.
-
Scale Up - if the threshold of the alarm i.e., Avg CPU utilization is greater than or equal to 70 for 3 consecutive periods of 60 seconds.
-
Scale Down – if the threshold of the alarm i.e., Avg CPU utilization less than or equal to 50 for 5 consecutive periods of 60 seconds.
-
Scale Up - if the threshold of the alarm i.e., Avg CPU utilization is greater than or equal to 70 for 3 consecutive periods of 60 seconds.
- Select the action to be taken as Scale Up or Scale Down depending on the threshold and choose to Create Alarm.
- Name and Description can be mentioned as per your wish, but for the ease of tracking, you can mention it as below.
Details
Scale Up
Scale Down
Name
Threshold for scale up
Threshold for scale down
Description
setting scale up threshold
Setting scale down threshold
- Open the CloudWatch console at https://console.aws.amazon.com/cloudwatch/
- After creating an Alarm successfully, follow the steps below.
- Select one alarm from the drop-down box of Execute Policy and provide instance number that needs to be scaled up in the Take the action section in the Increase Group Size widget.
- Select one alarm from the drop-down box of Execute Policy and provide the instance number that needs to be scaled down in the Take the action section in the Decrease Group Size widget.
- Click Next Configure Notification.
- Select one alarm from the drop-down box of Execute Policy and provide instance number that needs to be scaled up in the Take the action section in the Increase Group Size widget.
17 In Configure Notification page, click Add Notification and select one topic name from the drop-down and click Configure Tags.
18. In Configure Tags page, provide Key, Value and then click Review.
[E.g. Key – Name, Value – SaaS_Instance]
19. Review the Auto scaling group and click Create Auto Scaling Group.
Indusface TAS deployed behind CDN
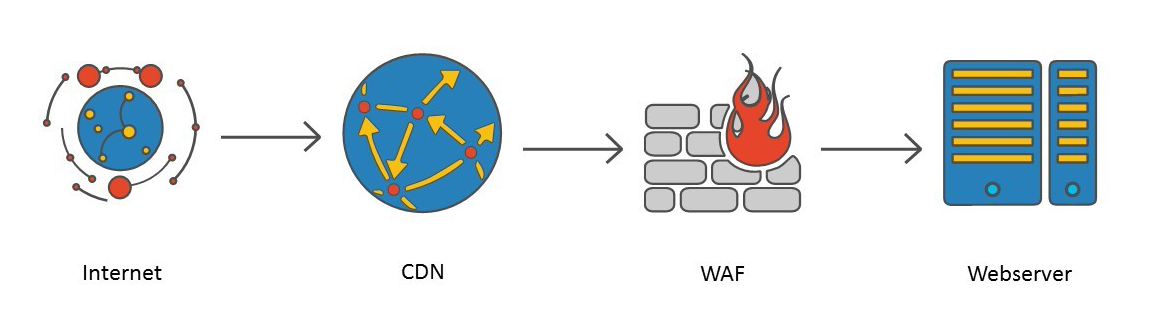
Figure 4: Topology of CDN and Web server
What happens when the web server is behind a CDN? In such cases, it is recommended to place WAF in between CDN and the web server. The topology will look as shown in the diagram above.
- Make the origin server of CDN point to WAF. Create a new CNAME and point it to WAF IP address.
- Make the WAF point to the original Webserver, by pointing WAF to original CNAME of an origin server.
Opening Web Sockets in TAS
By default, Indusface TAS will block the web socket packets. If your application support web socket packets, please contact Indusface Support to configure Indusface TAS to pass web socket packets to your server.