AppTrana
Getting Started
Frequently Asked Questions
Product Details
API Scan Coverage for OWASP Top 10
Whitelist Vulnerabilities on the AppTrana WAAP
API Request to Purge CDN Data
Analysis page - Attack Trend Visualisation
Advanced Behavioral DDoS
BOT Protection
Asset Discovery
Customize Application Behavior with Bot Score
Restricted Admin User
Self Service Rules
Configuring Custom Error Page in AppTrana
Enabling SIEM Integration
API Discovery Feature
SwyftComply
Analysis page - Access Trend Visualization
Manage WAAP Email Alerts
Enable and Configure Single Sign-On
WAF Automated Bypass and Unbypass
False Positive Analysis Report on WAAP
Product User Guide
Indusface WAS
Getting Started
Product User Guide
Summary
Dashboard
Malware Monitoring[MM]
Application Audit[AA]
Vulnerability Assessment[VA]
Reports
Settings
Asset Monitoring
New Reporting Structure
Frequently Asked Questions
Feature Summary
AcuRisQ – Risk Management with Advanced Risk Scoring
WAS Consulting License
API Key Based - Scan Log Export
WAS Defacement Checks
SIEM Integration with Sumo Logic
Indusface WAS Scanned Vulnerabilities
Total Application Security
Onboarding Documents
Indusface Newsletter
Indusface Product Newsletter - October 2021
Indusface Product Newsletter- April 2021
Indusface Product Newsletter-January21
Indusface Product Newsletter - June 20
Indusface Product Newsletter - October 19
Indusface Product Newsletter - August 19
Product Newsletter of May 19
Product Newsletter of March 19
Product Newsletter of January 19
WAF Portal Revamp June 18
Product Newsletter of July 18
Product Newsletter of May 18
Product Newsletter of March 18
Product Newsletter of February 18
Product Newsletter of January 18
Indusface Product Newsletter - March 2022
Indusface Product Newsletter - February 2023
Indusface Product Newsletter- October 2022
Zero Day Vulnerability Reports
Vulnerabilities Detected in 2023
Vulnerability Report of May 23
Vulnerability Report of March 23
Vulnerability Report of August 23
Vulnerability Report of July 23
Vulnerability Report of April 23
Vulnerability Report of November 23
Vulnerability Report of June 23
Vulnerability Report of December 23
Vulnerability Report of February 23
Vulnerability Report of January 23
Vulnerability Report of September 23
Vulnerability Report of October 23
Vulnerabilities Detected in 2016
CRS vs. Zero Day Vulnerability - December 2016
CRS vs. Zero Day Vulnerability - November 2016
CRS vs. Zero Day Vulnerability - October 2016
CRS vs Zero Day Vulnerability - September 2016
CRS Vs Zero Day Vulnerabilities - August 2016
Vulnerabilities Detected in 2017
Vulnerability Report of April 17
Vulnerability report for Apr 3rd - Apr 9th 17
Vulnerability report for April 17th - Apr 23rd 17
Vulnerability report of April 10th - April 16th
Vulnerability Report of March 17
Vulnerability report for Mar 20th - Mar 26th
Vulnerability report for Mar 13th - Mar 19th
Vulnerability report for 27th Feb - 5th Mar
Vulnerability report for Mar 27th - Apr 2nd
Vulnerability report for Mar 6th - Mar 12th
Vulnerability Report of February 17
Vulnerability Report of January 17
Vulnerability Report of December 17
Vulnerability Report of November 17
Vulnerability Report of August 17
Vulnerability Report of September 17
Vulnerability Report of October 17
Vulnerability Report of July 17
Vulnerability Report of June 17
Vulnerability Report of May 17
Vulnerabilities Detected in 2018
Vulnerability Report of December 18
Vulnerability Report of November 18
Vulnerability Report of October 18
Vulnerability Report of September 18
Vulnerability Report of August 18
Vulnerability Report of July 18
Vulnerability Report of June 18
Vulnerability Reports of May 18
Vulnerability Report of April 18
Vulnerability Report of March 18
Vulnerability Report of February 18
Vulnerability Report of January 18
Vulnerabilities Detected in 2019
Vulnerability Report of December 19
Vulnerability Report of November 19
Vulnerability Report of October 19
Vulnerability Report of September 19
Vulnerability Report of August 19
Vulnerability Report of July 19
Vulnerability Report of June 19
Vulnerability Report of May 19
Vulnerability Report of April 19
Vulnerability Report of March 19
Vulnerability Report of February 19
Vulnerability Report of January 19
vulnerabilities Detected in 2020
Vulnerability Report of December 20
Vulnerability Report of November 20
Vulnerability Report of October 20
Vulnerability Report of Sep 20
Vulnerability Report of July 20
Vulnerability Report of June 20
Vulnerability Report of May 20
Vulnerability Report of April 20
Vulnerability Report of March 20
Vulnerability Report of February 20
Vulnerability Report of January 20
Vulnerabilities Detected in 2021
Vulnerability Report of November 21
Vulnerability Report of October 21
Vulnerability Report of September 21
Vulnerability Report of August 21
Vulnerability Report of July 21
Vulnerability Report of June 21
Vulnerability Report of May 21
Vulnerability Report of April 21
Vulnerability Report of March 21
Vulnerability Report of February 21
Vulnerability Report of January 21
Vulnerability Report of December 21
Vulnerabilities Detected in 2022
Vulnerability Report of January 22
Vulnerability Report of February 22
Vulnerability Report of March 22
Vulnerability Report of April 22
Vulnerability Report of May 22
Vulnerability Report of June 22
Vulnerability Report of July 22
Vulnerability Report of August 22
Vulnerability Report of September 22
Vulnerability Report of October 22
Vulnerability Report of November 22
Zero-Day Vulnerability Report - December 2022
Vulnerabilities Detected in 2024
Security Bulletin
Vulnerabilities 2024
Critical Apache OFBiz Zero-day AuthBiz (CVE-2023-49070 and CVE-2023-51467)
ScreenConnect Authentication Bypass (CVE-2024-1709 & CVE-2024-1708)
CVE-2024-1071 – Critical Vulnerability in Ultimate Member WordPress Plugin
Oracle WebLogic Server Deserialization
ApacheStructs_VG
Apache Struts 2 Vulnerability CVE-2023-50164 Exposed
Unpacking the Zimbra Cross-Site Scripting Vulnerability(CVE-2023-37580)
Adobe ColdFusion Vulnerabilities Exploited in the Wild
Remote Unauthenticated API Access Vulnerabilities in Ivanti
Multiple Moveit Transfer Vulnerabilities
HTTP/2 Rapid Reset Attack Vulnerability
Apache log4j RCE vulnerability
- All Categories
- AppTrana
- Product Details
- Enable and Configure Single Sign-On
Enable and Configure Single Sign-On

Streamline access with Single Sign-On (SSO) on AppTrana WAAP, simplifying login processes for your team and ensuring seamless authentication, eliminating the need for repeated sign-ins.
Part 1: Enable AppTrana WAAP Single Sign-On (SSO)
- Log in to the AppTrana WAAP portal and navigate to Manage -> Single Sign-On.
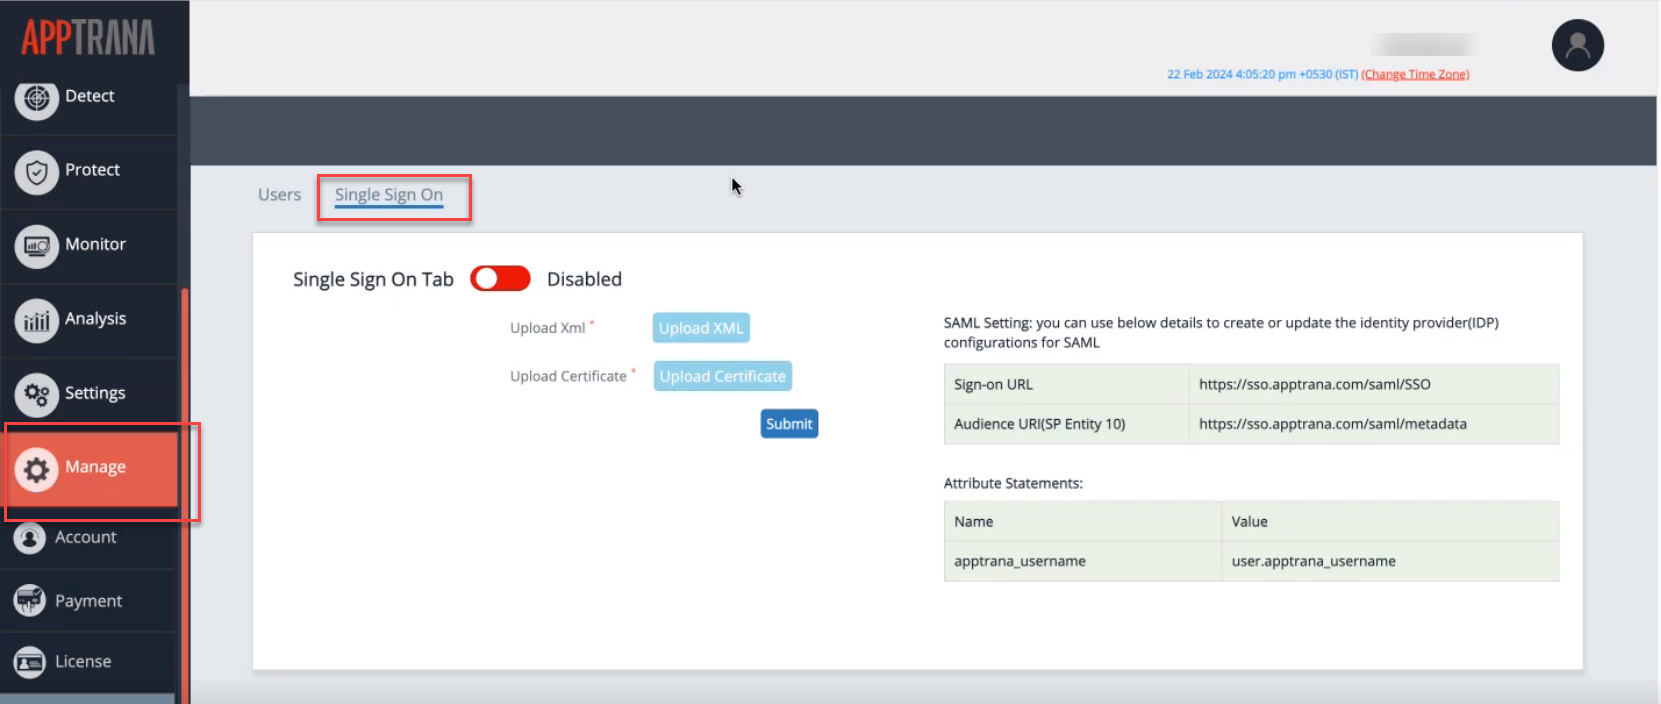
- Toggle the Single Sign-On tab to Enabled.
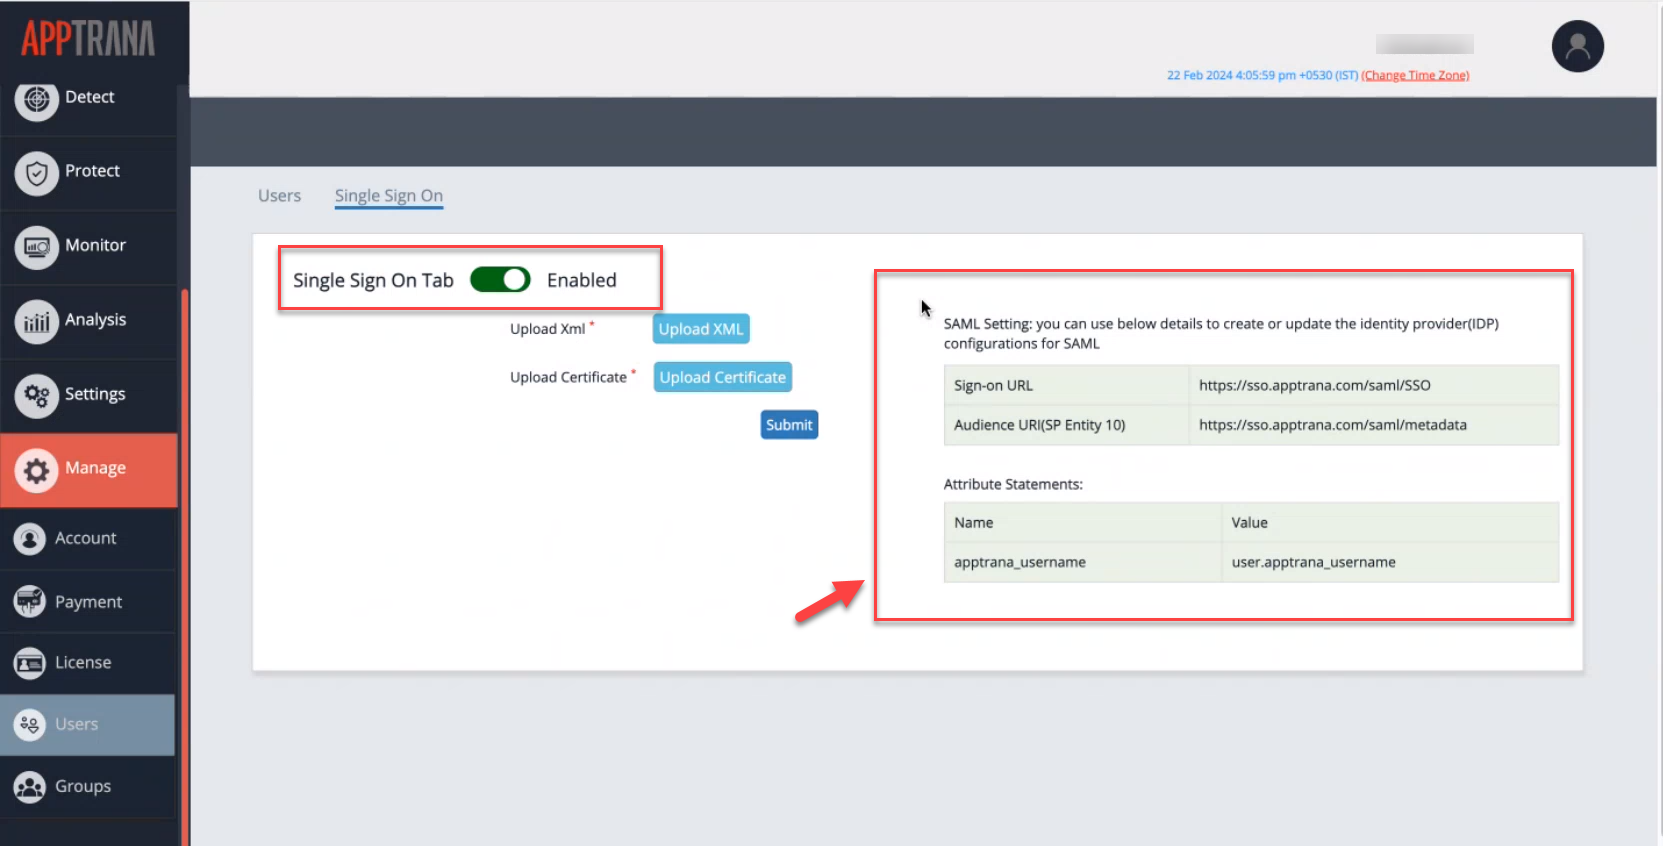
Note down the details displayed on the screen for configuring Okta, your identity provider.
Part 2: Okta Configuration for SSO
Follow the step-by-step guide to create the application on OKTA "https://developer.okta.com/login/".
Generate IDP Metadata file and Certificate
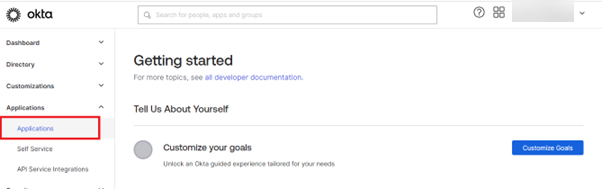
- Login to url https://developer.okta.com/login/ with a gmail account or sign-up with an email.
- To create an application in OKTA, click on Applications
- Click on "Create App Integration"
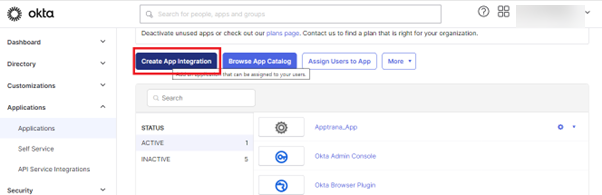
- Select "SAML 2.0", and click "NEXT"
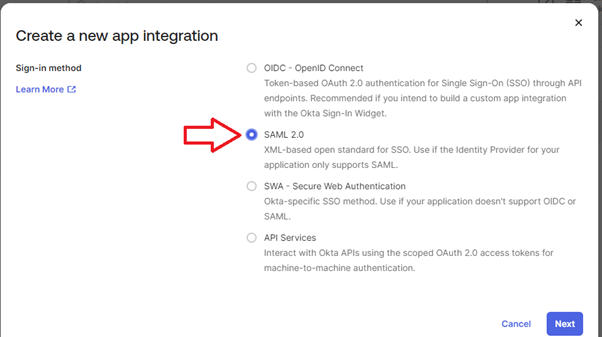
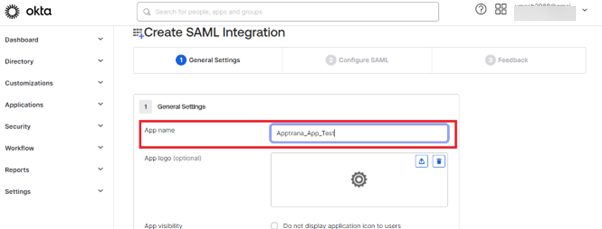
- Give any "App Name" as per your convenience, click "NEXT".
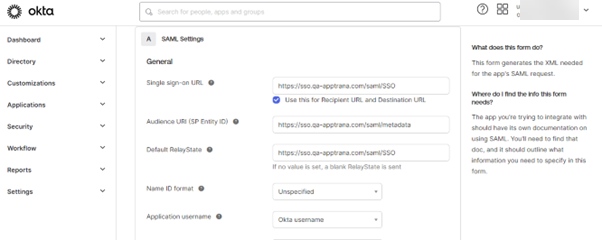
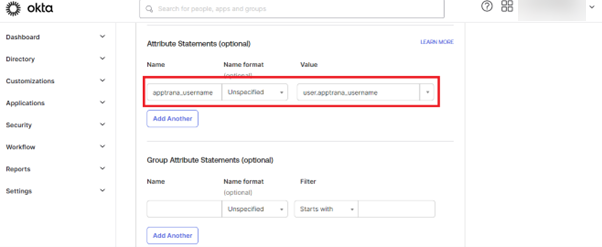
- In "SAML Setting" enter all the data as mentioned in the below screen shot. (Copied from Part 1)
We have used URL "https://sso.qa-apptrana.com" because the "SSO-SVC" code is deployed on the machine sso.qa-apptrana.com.
- Click NEXT
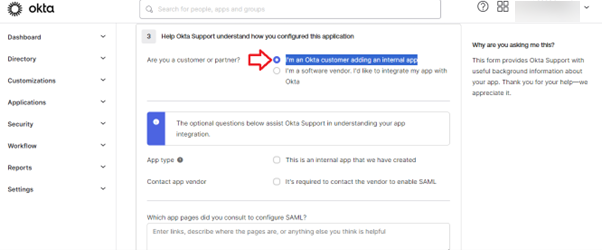
- Select this "I'm an Okta customer adding an internal app" option and click on "Finish".
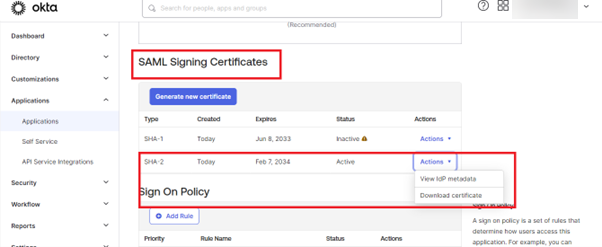
- After "Finish", click on "View IdP metadata" save it with .xml extension and "Download Certificate".
- After you have an IDP and Certificate file you can upload these files using UI.
Create user and assign it to Application which we created in above step
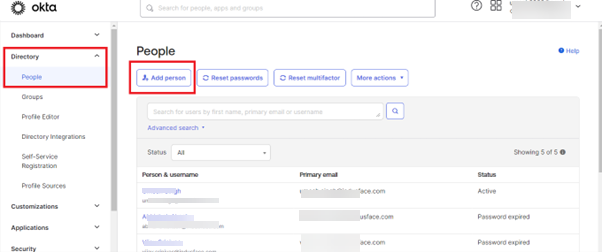
- Click on Directory --> People --> Add Person
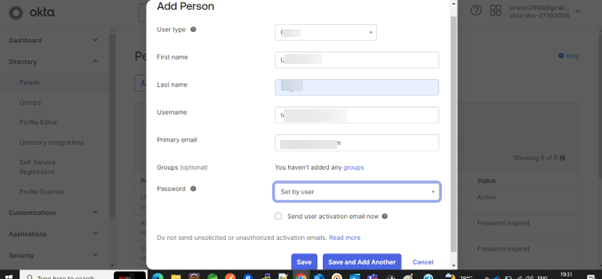
- Fill the respective details of the users you want to add and click on Save.
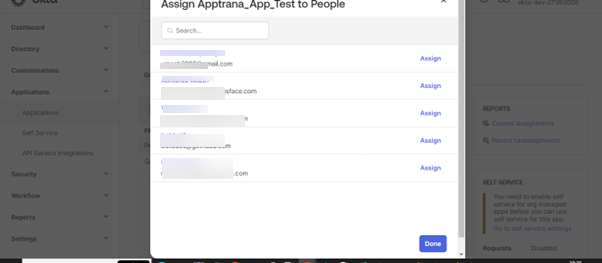
- Once a user is created. Go to Applications --> Assignments --> Assign --> Assign to People
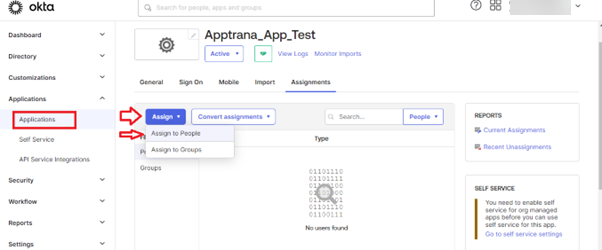
- Click on Assign to how many users you want to assign to the particular application. Once the assignment of users is completed, click on Done.
Part 3: Configuring AppTrana WAAP Single Sign-On (SSO)
- Upload the XML and Certificate downloaded from Okta in Part 2 Setup.
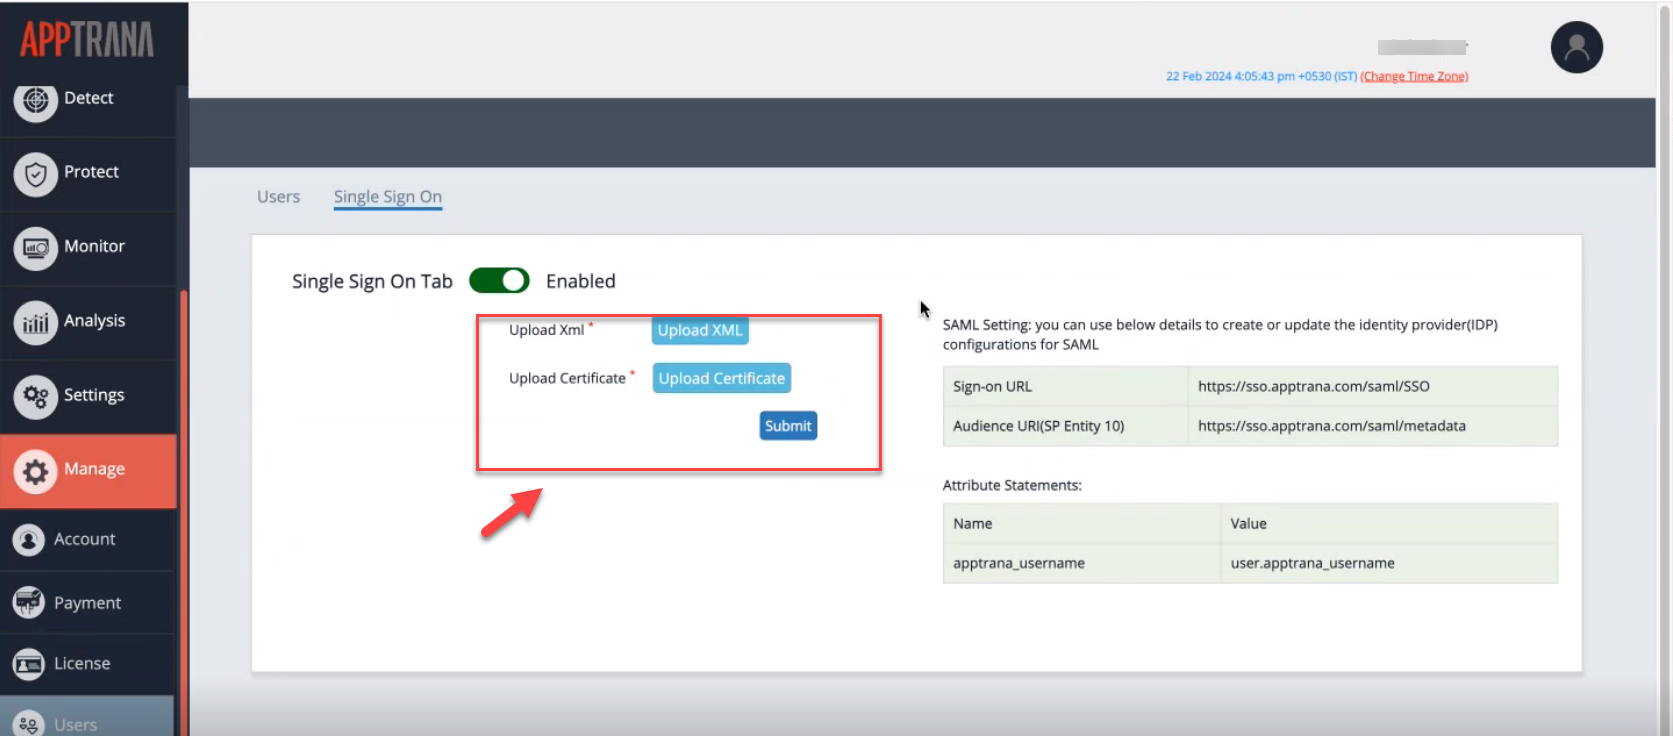
- Click Submit to complete the setup.

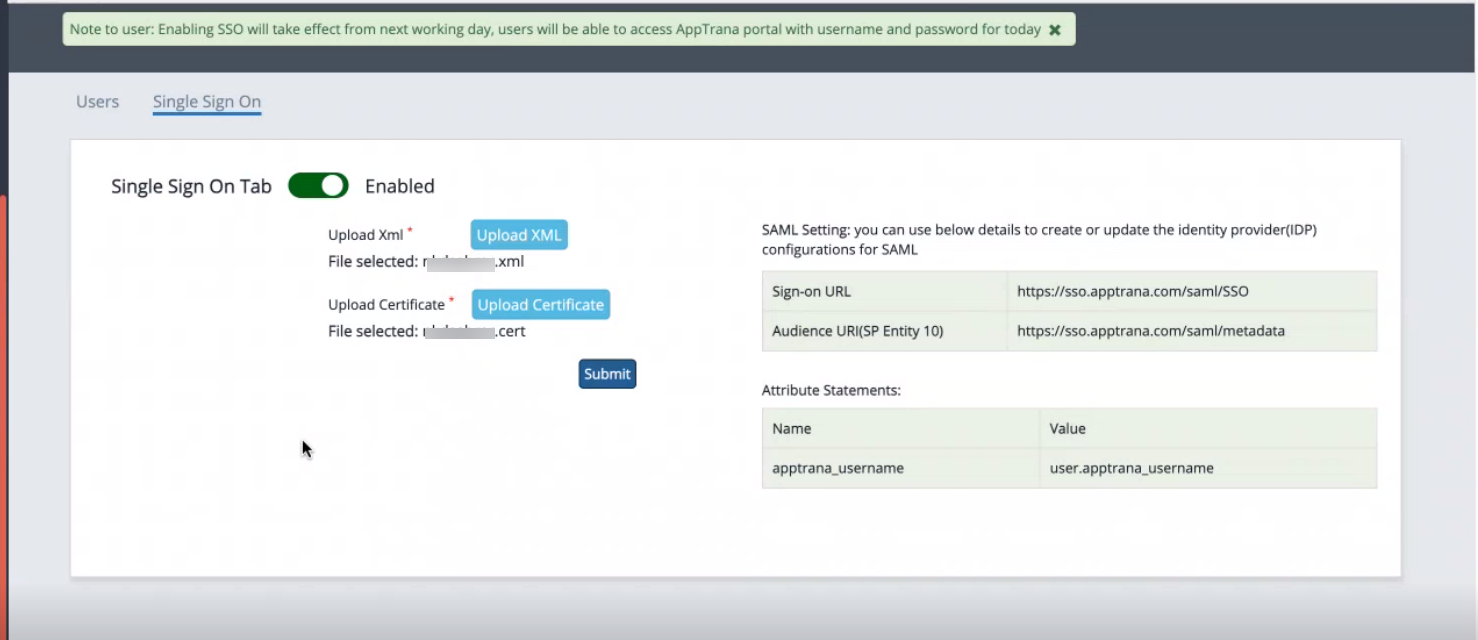
After SSO activation, users with SSO enabled can log in directly to AppTrana using their username.
SAML Integration With Azure
To configure SAML in AppTrana WAAP, you'll need specific items from Azure. Follow these steps to obtain them:
Required items from Azure
To set up SAML in AppTrana WAAP, you'll need specific details from Azure. Here's what you'll need to gather:
- Certificate (Base 64)
- Login URL
- Logout URL
Steps to configure SAML
- Create a new application (Only Admin Access can do this):
- Sign in to your Microsoft Azure portal as an admin.
- Navigate to Azure Active Directory, and Go to Enterprise Applications under Manage.
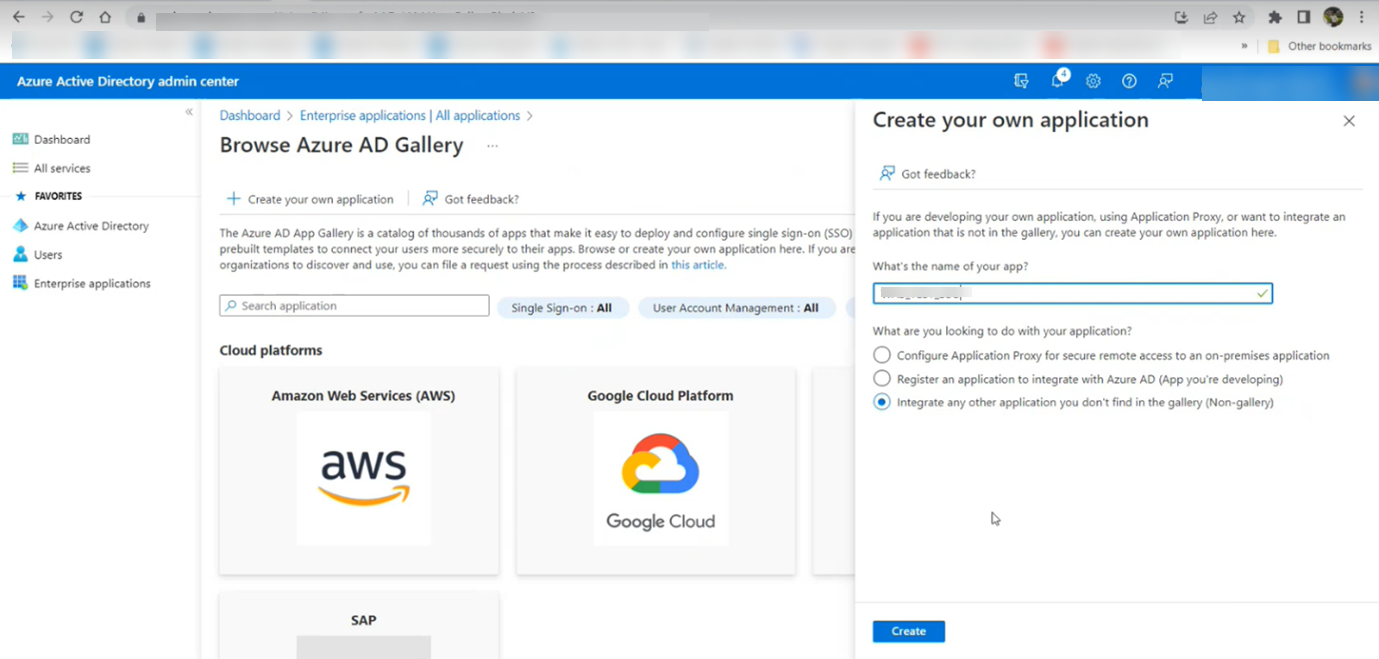
- Select All Applications, then click New Application. Choose Create your own application.
- Add the Application name
- Enter a name for your application.
- Select "Integrate any other application you don't find in the gallery" and click Create.
- Once you've completed these steps, you'll have access to the required configurations from Azure to set up SAML in AppTrana WAAP.
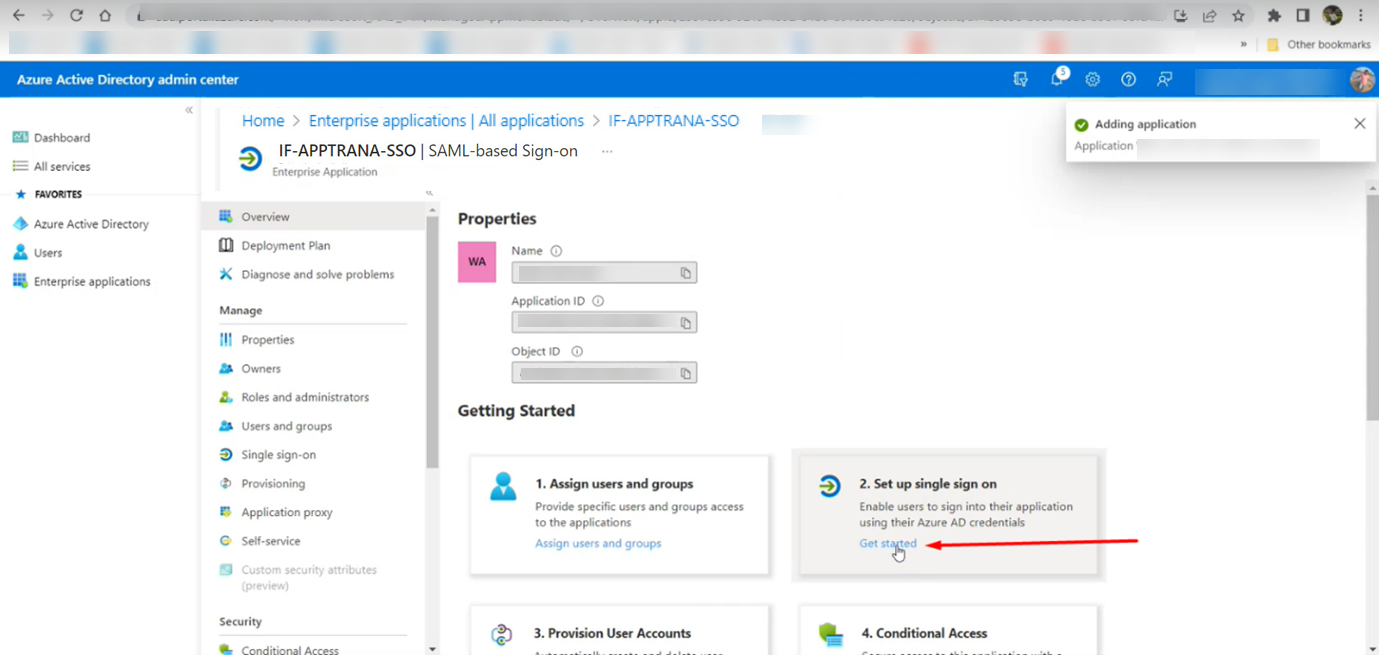
- Set up WAAP details in Azure for SSO:
- Go to the "Set up single sign-on" option. Click on "Get Started" as indicated in the screenshot below.
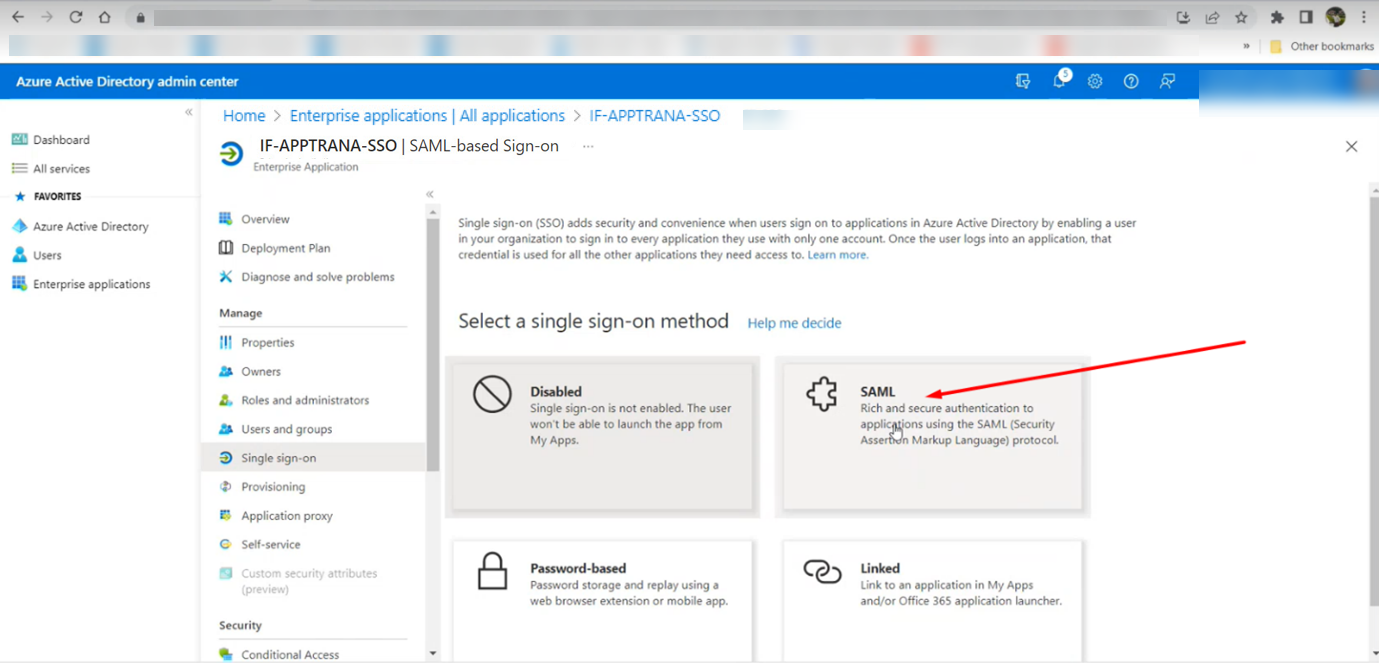
- Choose the SSO method from the available options. Select the SAML option as shown in the screenshot below
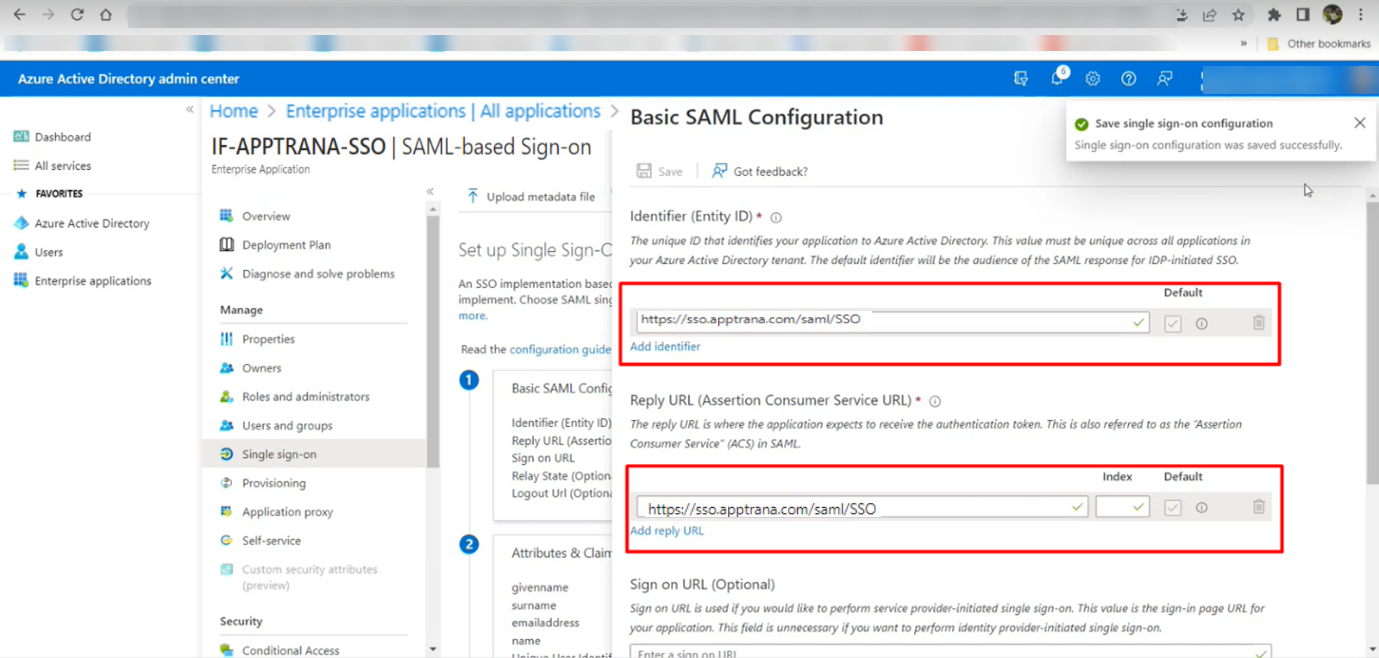
- Now, add Identifier (Entity ID) & Reply URL in basic SAML Configuration according to the following steps and screenshot:
- Click on the Edit option located in the right corner to update the requested URLs.
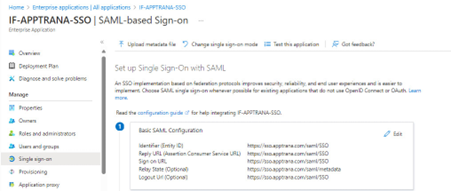
- Add Identifier (Entity ID) URL: Input the URL audience URI (SP Entity ID) obtained from the WAAP portal’s SSO configuration section, e.g., https://sso.apptrana.com/saml/SSO.
- Add Reply URL: https://sso.apptrana.com/saml/SSO.
- Add Sign-on URL: https://sso.apptrana.com/saml/SSO.
- Add Relay State: https://sso.apptrana.com/saml/SSO/metadata.
- Logout Url: https://sso.apptrana.com/saml/SSO/
- Once added, click Save and Proceed.
- Next, proceed to Add Attribute: Click on the Edit option as indicated in the screenshot below.
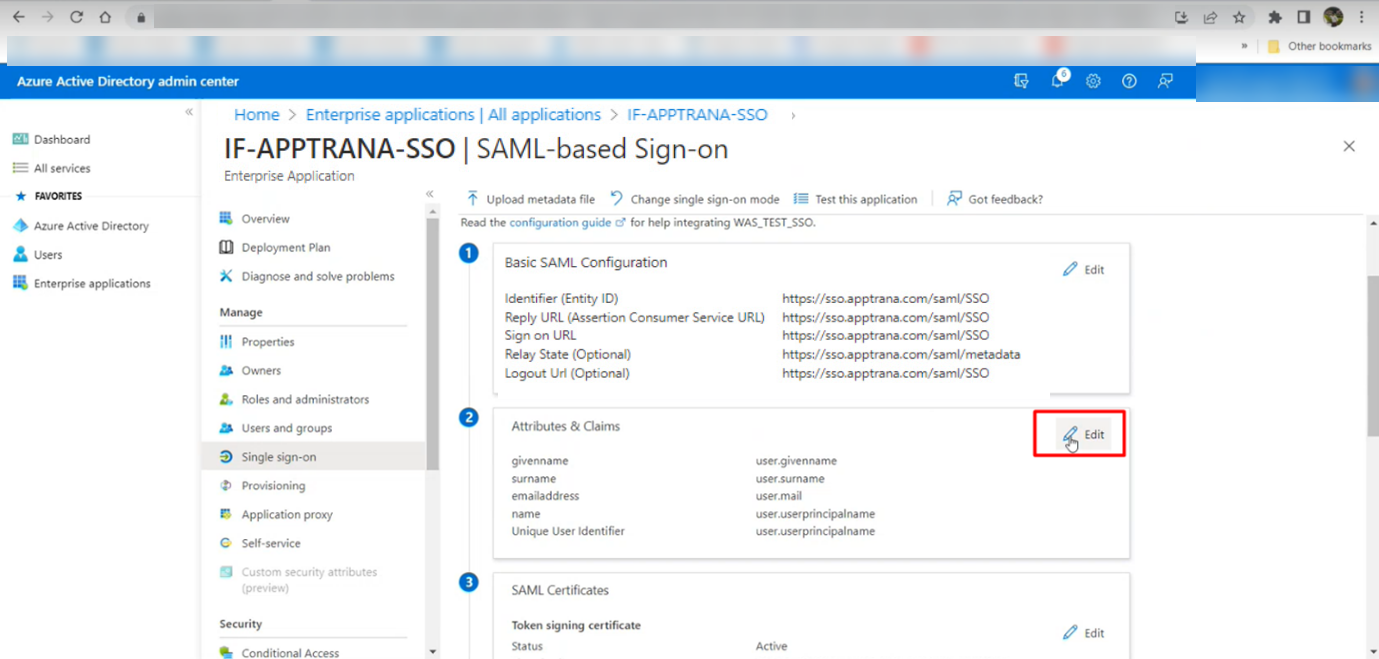
- Upon clicking, you will be directed to an interface for Attributes & claims, you need to click on the "Add new claim" option as shown in the screenshot below.
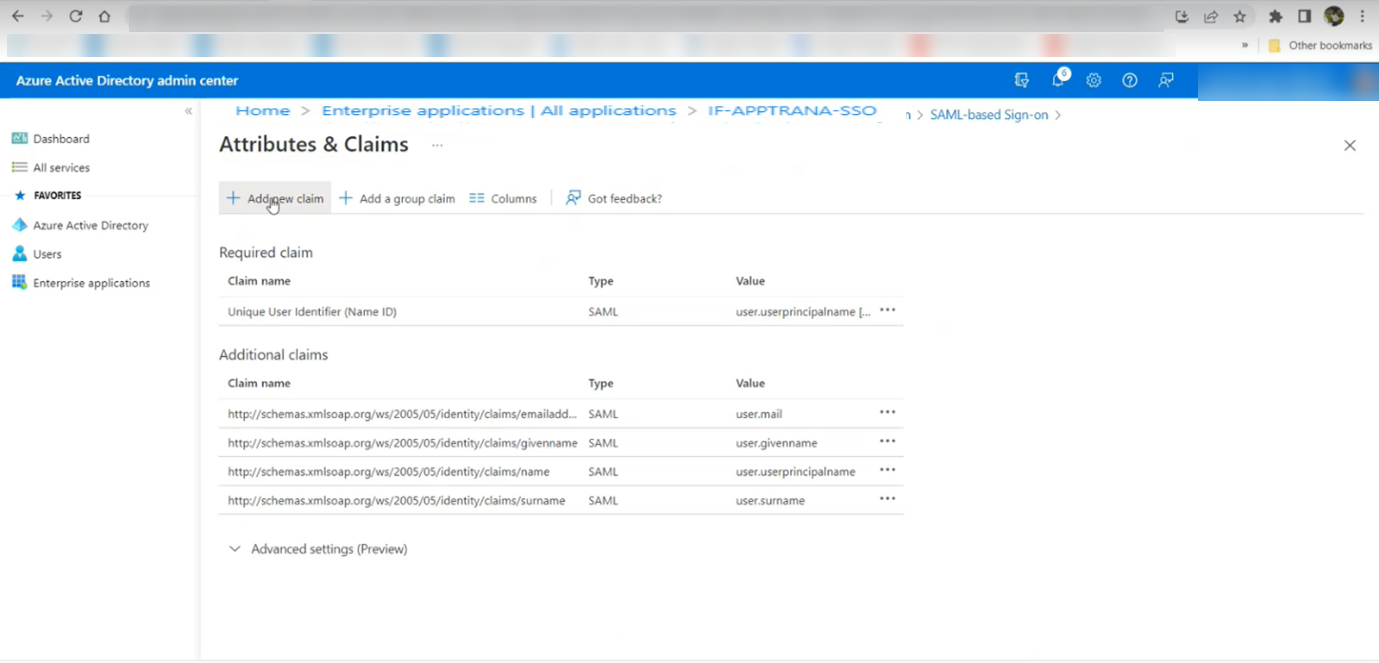
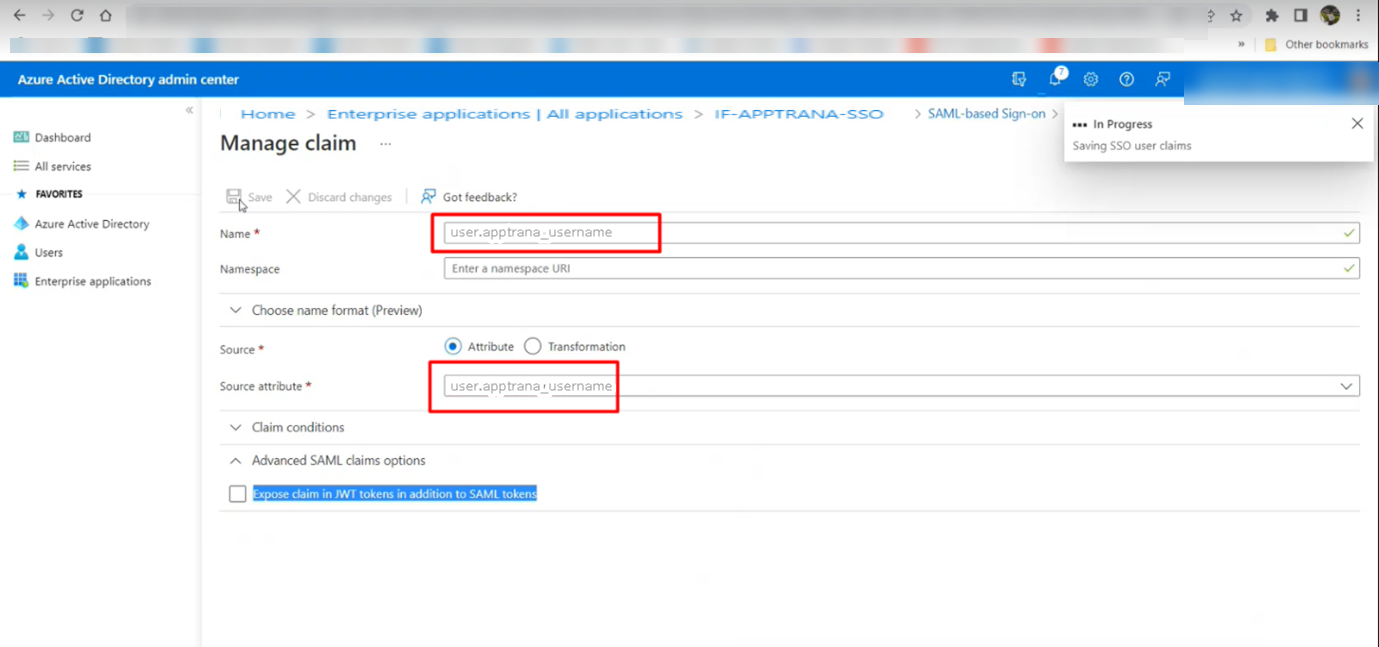
- After clicking, add the attribute name and attribute value obtained from the WAAP portal’s SSO configuration section.
- Add Name as "user.apptrana_username".
- Add Source attribute as "user.apptrana_username".
Once added, click Save and Proceed.
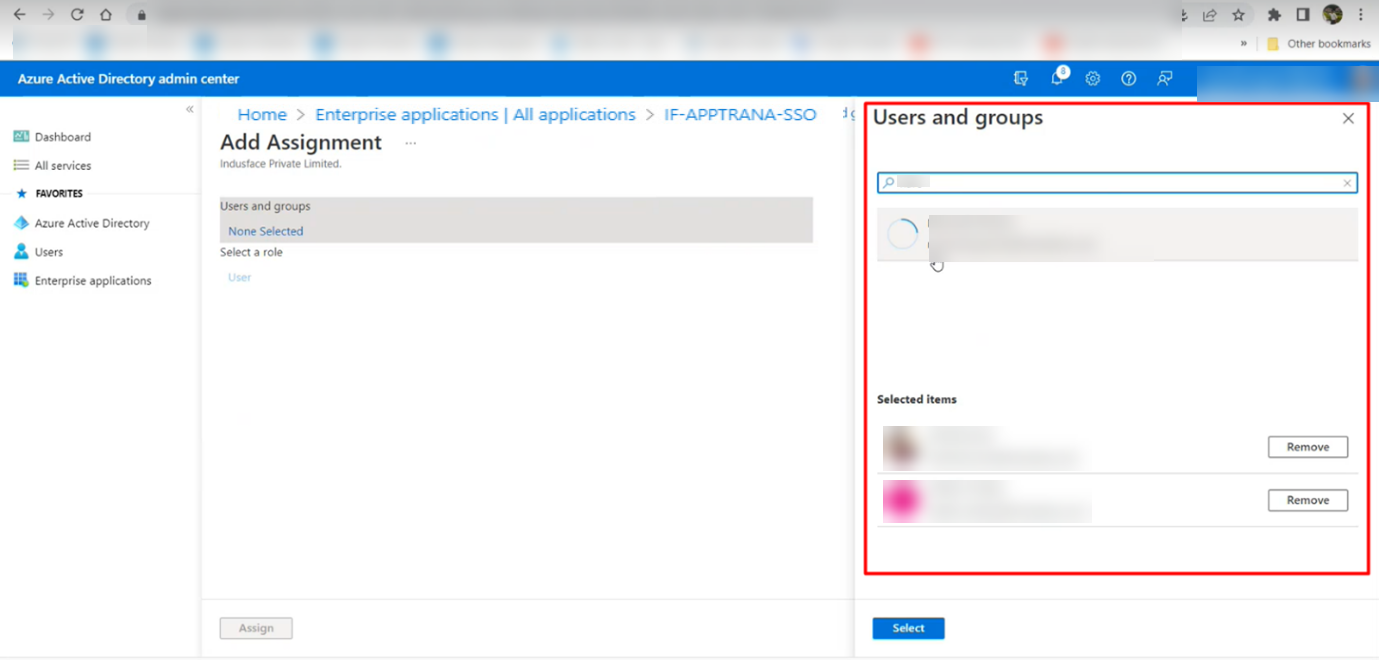
- Assign Users/Groups to the application:
· After creating the app, proceed to assign users to access it.
· Select the recently created application.
· Navigate to the User and Groups section, as indicated in the screenshot below.
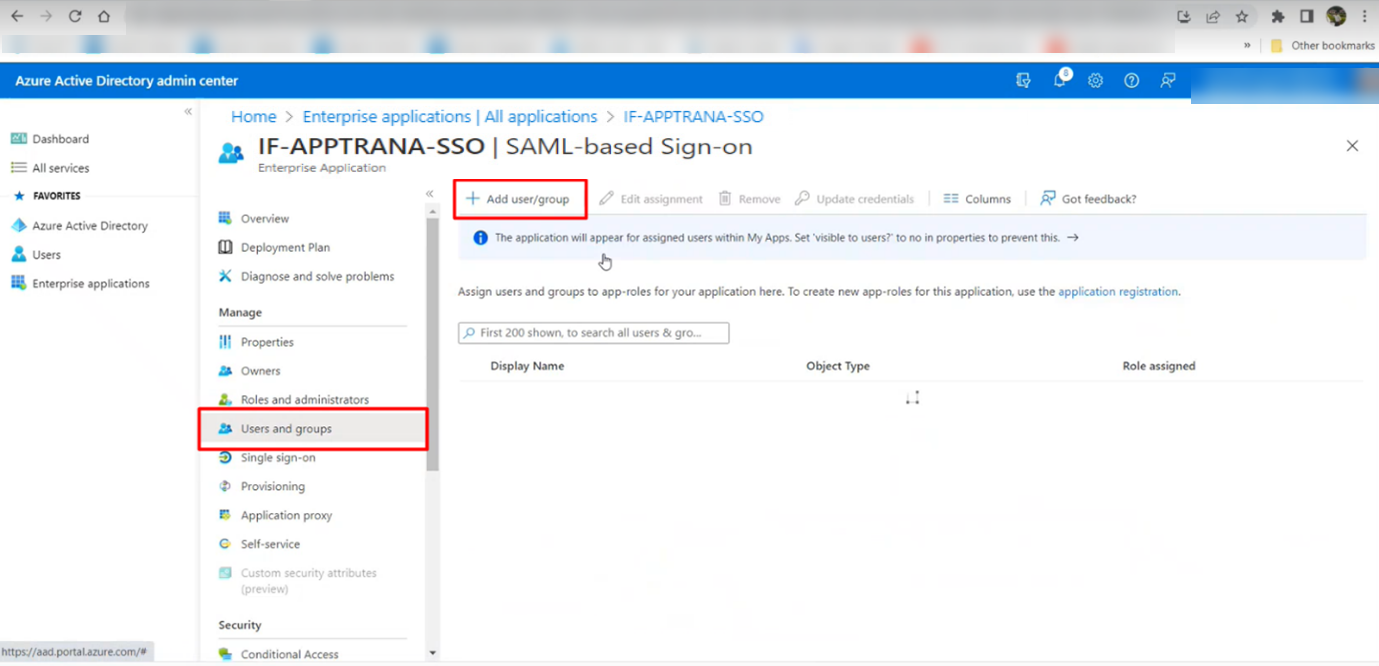
· Click on the "Add user/group" option.
· Add the users/groups from the available list of your users to the application and Save.
· Once saved, all the Azure configurations for the SSO configuration are complete.
- Download the SSO application certificates from Azure:
· Navigate back to the Single sign-on application that you recently created.
· Scroll down until you find the section labeled "SAML certification".
· From here, download the Certificate (Base64) and Federation Metadata XML as shown in the screenshot below.
· Save these files in a folder that is easily accessible.
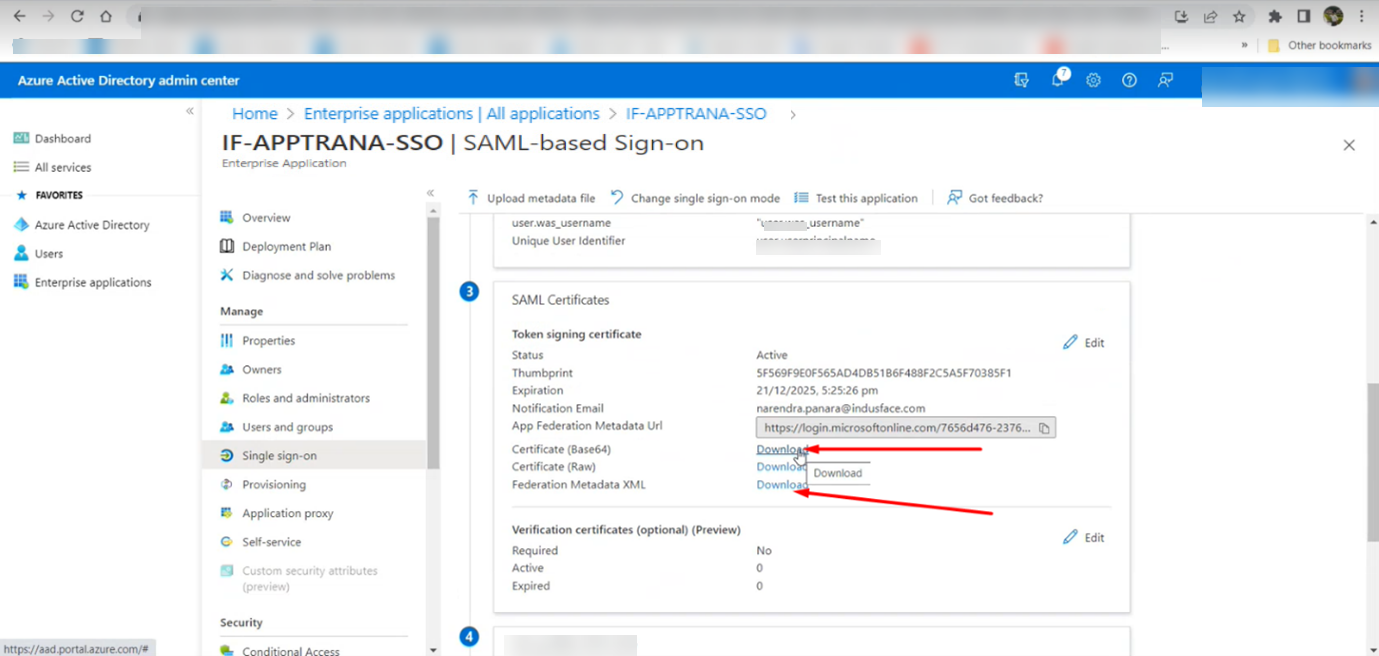
- Upload the download the Certificate (Base64) and Federation Metadata XML downloaded from Azure Setup to the AppTrana WAAP for SSO activation. (Refer: Part 3: Configuring AppTrana WAAP Single Sign-On (SSO))
