Discover Assets
The Discover Assets feature helps you find and manage your public-facing assets including web applications and APIs. It gives you full visibility into these assets and displays details such as public IP addresses, subdomains, and hosting data centers. This helps you maintain an accurate and up-to-date inventory for stronger security.
How to Access Discovered Assets
To view newly discovered assets:
- Select the All Domains filter.
- Go to Applications & Groups > Discover & Manage.
Note: If you select an individual domain in the filter, the tab name changes to Manage Assets. The tabs under this section differ from those under Discover and Manage.
Discovered Root & Sub Domains
The discovery results show:
- The date of the last scan
- Total number of root and subdomains
- Subdomain count for each root domain
- Number of included TLDs (Top-Level Domains)
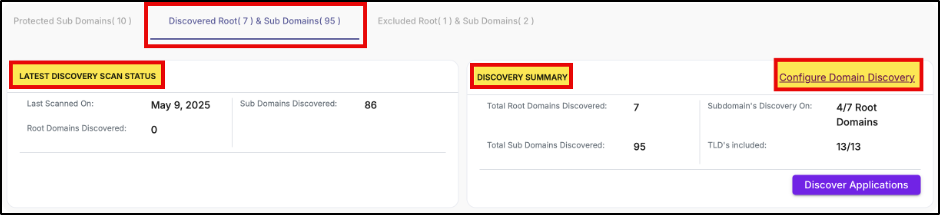
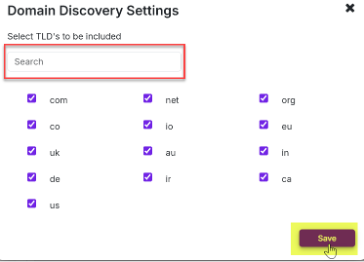
Configure Domain Discovery Settings by TLDs
Fine-tune domain discovery settings by managing TLDs.
- Go to Discover Summary > Configure Domain Discovery.
- Review the list of TLDs with checkboxes. All are selected by default.
- To exclude a TLD, uncheck the box next to it.
- To include a specific TLD, use the search bar and check the box.
- Click Save to apply your changes.
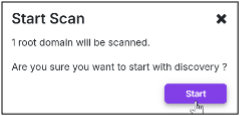
Discover Applications
To initiate a discovery scan:
- In the Discover Summary, click Discover Applications.
- A confirmation pop-up appears showing the number of root domains that will be scanned.
- Choose to include or exclude specific root domains.
- Click Start to begin the scan.
Note: Discovery may take up to 72 hours to complete and identify all related subdomains
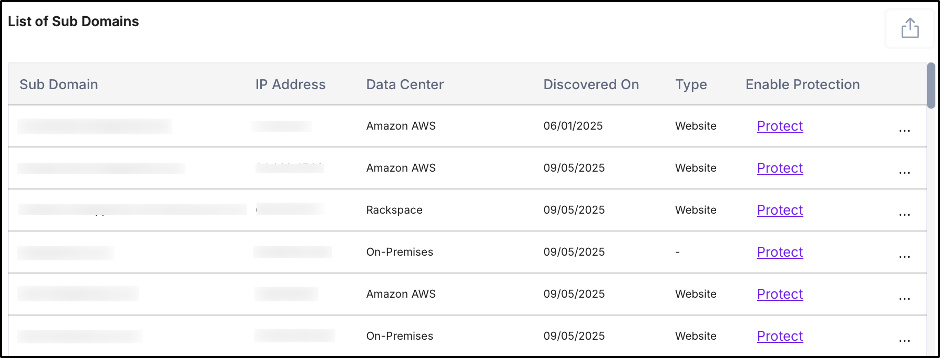
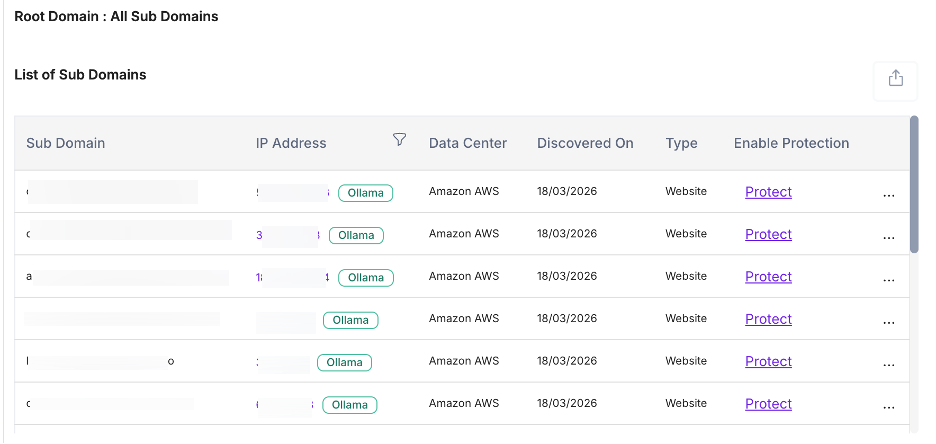
List of Subdomains
After the scan completes, you will see a list of discovered subdomains for each root domain, along with the following details:
| Parameter | Description |
| Subdomain | Name of the subdomain. |
| IP Address | Subdomain's public IP. |
| Data Center | Hosting location. |
| Discovered On | Date discovered. |
| Type | Type of Subdomain discovered (e.g., Website, API) |
| Enable Protection | One Click Onboarding of unprotected Subdomains to AppTrana. |
| Action | Click Ignore to move subdomain Ignored Tab. |
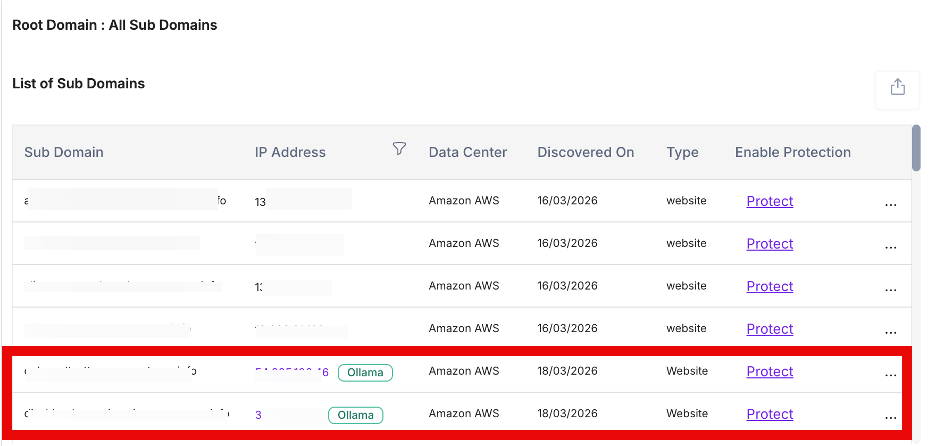
AI Server Exposure
AppTrana surfaces exposed AI runtime services, such as Ollama, and highlights them within the discovered subdomain inventory when they are publicly accessible due to misconfiguration or missing access controls.
These assets are automatically tagged (e.g., Ollama) to help you quickly filter and isolate AI-related exposures across your environment.
AI Server Detail View (IP-Level)
Clicking on the IP address opens a detailed view of the identified AI server.
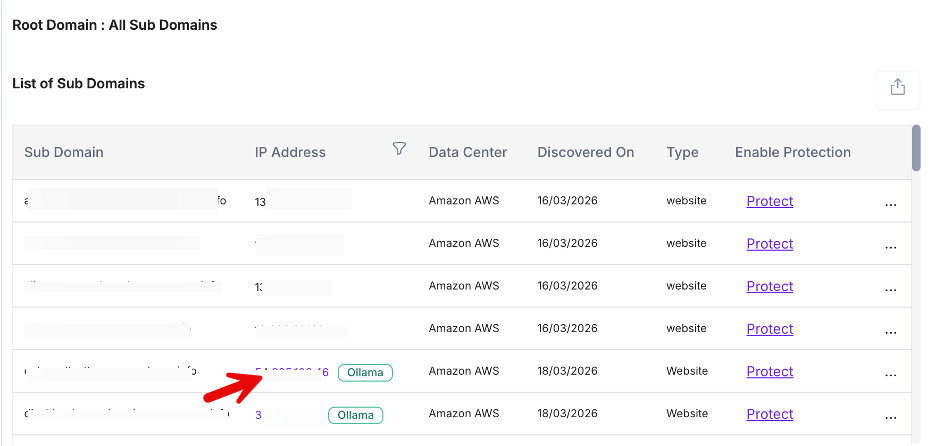

This view provides:
- Open port details (e.g., 443)
- Detected web server information
- List of hosted AI models (e.g., DeepSeek, GPT variants)
This allows security teams to validate exposure, understand the runtime environment, and take immediate action.
Filtering AI Exposures
Use the Filter option to view only assets tagged as AI services (e.g., Ollama).
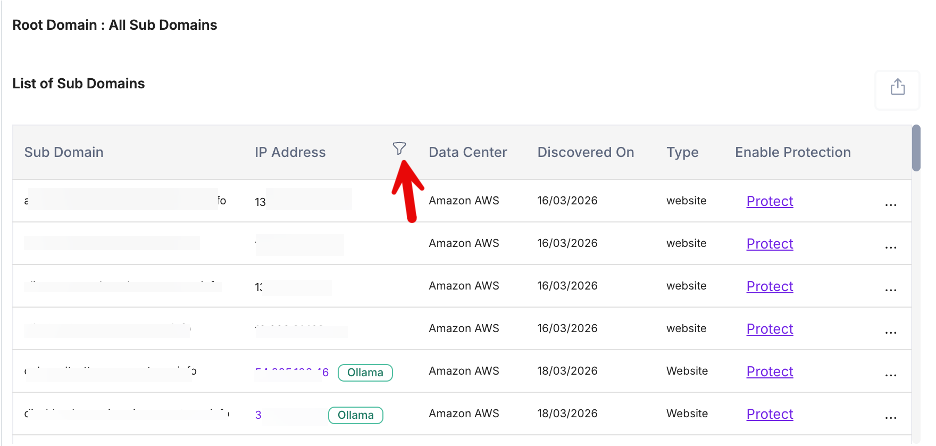
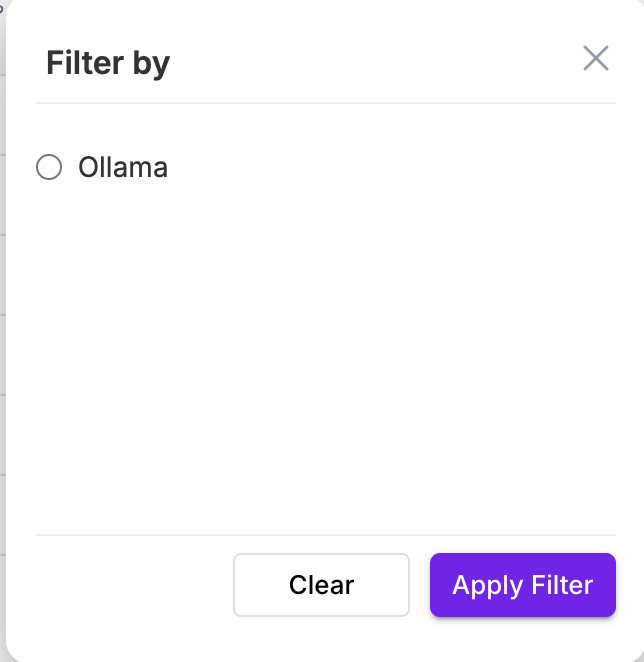
This helps you quickly identify shadow AI deployments, prioritize remediation of high-risk assets and reduce noise from non-AI infrastructure.
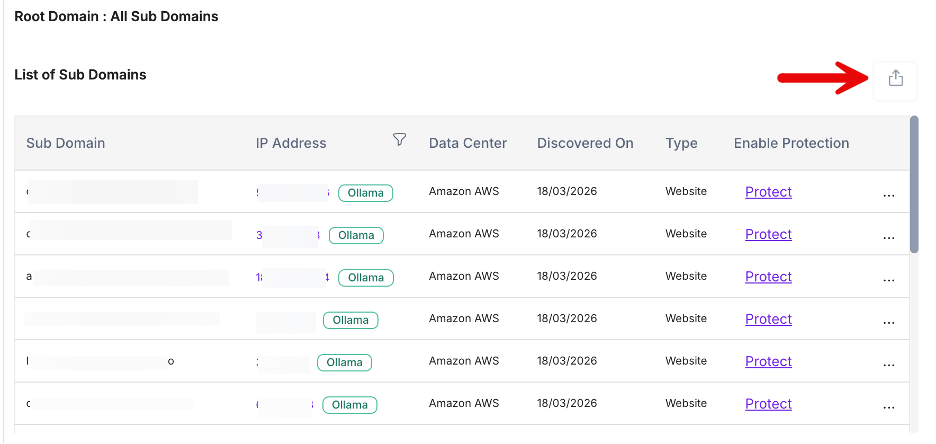
Exporting Asset Inventory Data
You can download the complete asset inventory for offline analysis, reporting, and remediation tracking.
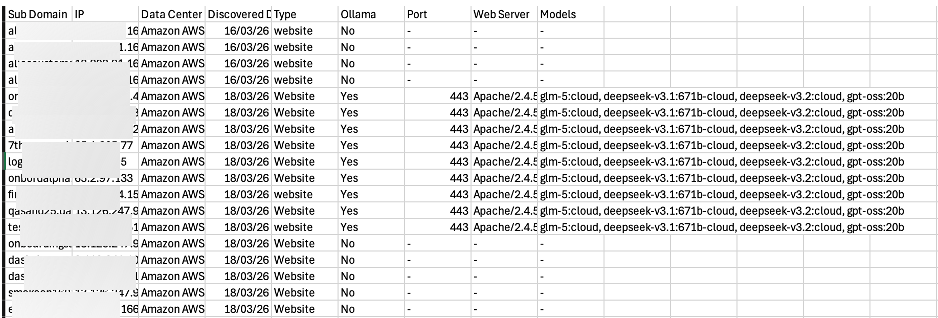
Parameter | Description | Applicable To |
|---|---|---|
| Subdomain | Name of the discovered subdomain | All assets |
| IP Address | Public IP address mapped to the subdomain | All assets |
| Data Center | Hosting provider or infrastructure location (e.g., AWS, On-Premises) | All assets |
| Discovered Date | Date when the asset was identified during the scan | All assets |
| Type | Asset type (e.g., Website, API) | All assets |
| AI Detection | Indicates if an AI runtime (e.g., Ollama) is detected (Yes/No) | All assets |
| Port | Open port used by the detected AI service (e.g., 80, 443) | AI-detected assets only |
| Web Server | Detected server details for the AI runtime (e.g., Apache version) | AI-detected assets only |
| Models Detected | List of AI models exposed via the service | AI-detected assets only |
Configure Root Domains
Manage whether a root domain is included in future scans.
- Navigate to the Root Domains section.
- Use the search bar to locate the domain.
- Use the toggle switch to Include or Exclude the domain.

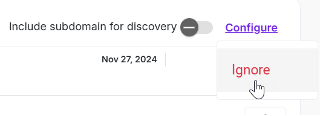
4. To ignore a domain completely, click Configure > Ignore.
Excluded Root & Sub Domains
Excluded Root Domains
| Parameter | Description |
| Root Domain | Name of the excluded root domain. |
| IP Address | IP address of the domain. |
| Data Center | Hosting location. |
| Discovered On | Date of discovery. |
| Action | Click Restore to re-include in protection. |
Restore Root Domain
To restore:
- Locate the domain in the table.
- Click Restore in the Actions column.
- Confirm restoration in the pop-up

Excluded Subdomains
View ignored subdomains that can be restored.
| Parameter | Description |
| Subdomain | Name of the subdomain. |
| IP Address | Subdomain's public IP. |
| Data Center | Hosting location. |
| Discovered On | Date discovered. |
| Action | Click Restore to move subdomain back into protection. |
Protected Subdomains
Lists onboarded subdomains and their security metrics.
| Parameter | Description |
| Asset Name | Protected subdomain name. |
| Last Scan | Date of the most recent scan. |
| Open Vulnerabilities | Number of unresolved issues by severity. |
| Bandwidth Usage | Data used by the application. |
| Total Attacks | Number of detected attacks. |
| WAF Status | Current Web Application Firewall mode. |
| API Policy Creation | Displays the number of API sites protected using Positive Security Rules. This metric is shown only when the site type is set to API or Hybrid. |
| Plan | Subscription plan assigned (e.g., Premium, Advanced). |
| Actions | Includes options like Unprotect or Download Report. |
You can group subdomains for better management and view metrics per group.

Add a New Application
To onboard a new subdomain:
- Click Add Application from the application list view.
Edit Group
- Selecting a group updates the dashboard to show group-specific data.
- Click Edit Group (available only for custom groups) to modify the group.
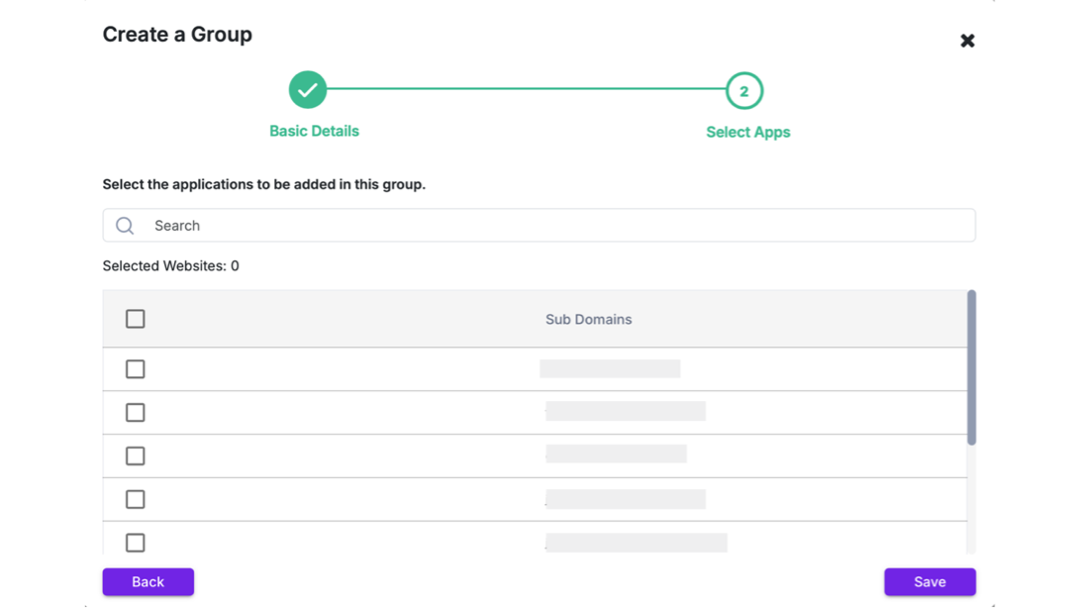
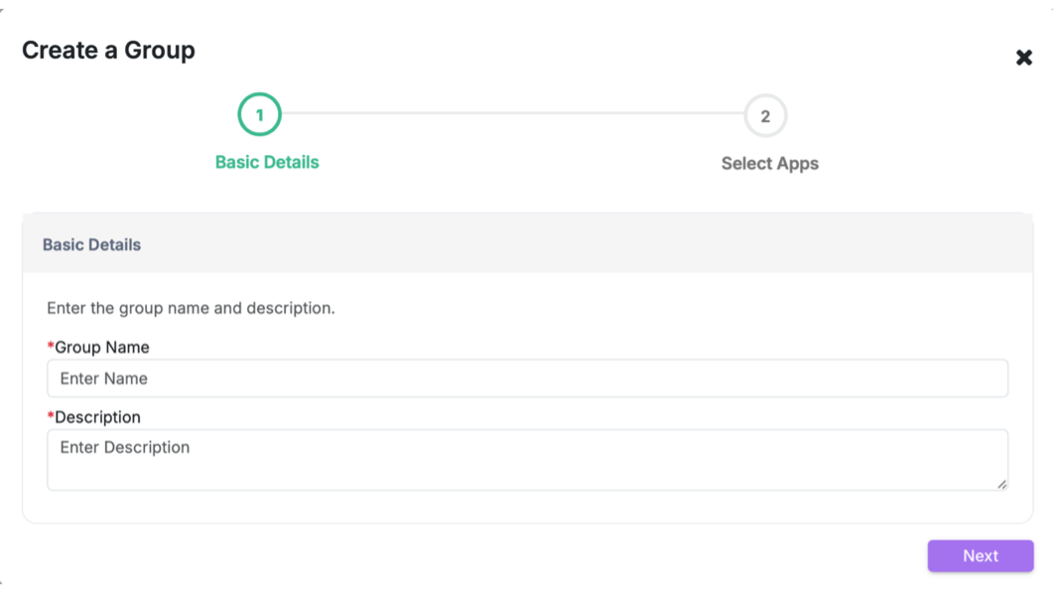
Create a Group
Creating a custom application group helps you organize related subdomains or applications under a single dashboard view. This allows security teams to monitor metrics, manage vulnerabilities, and apply security policies more efficiently across specific business units, regions, or application types.
To create a custom application group:
Step 1: Enter Basic Details
- Go to Groups > Create Group.
- Enter the Group Name and Description.
- Click Next.
Step 2: Select Applications
- Use the checkboxes to select subdomains.
- Use the search bar to filter.
- Click Save.
The new group appears alongside All Sites